
Thursday, 24 May 2018

Wednesday, 23 May 2018
Be TarpSmart
Be TarpSmart
By Hati Whiteley
24, Sep, 2017
24, Sep, 2017
Avoid tying yourself in knots and getting tangled in your tarp with top tips from the team tarpologists.

In pictures


However nonchalantly you mention tarpology to non-adherents of the way of the tarp, the response is often somewhere between a blank stare of disbelief and quietly edging out of the room.
“What? Tarp? Like a sheet of fabric?”
It may only seem like a sheet of fabric, you explain, but it’s the most versatile sheet of fabric you’ve ever seen.
Welcome to tarpology.


When it comes to tarpology, your creativity may know no limits
No, we’re not smithing words! Tarpology if the art of using a simple sheet of fabric as shelter. As the summer dances by without our noticing and we try our best to make the most of those light evenings before they fade away, little feels quite so simple as flinging your tarp in your work bag in the morning just in case the weather holds out.

Equipped with just a tarp, you can make anywhere your home
We don’t claim to have reached tarp guru status quite yet, but we’ve picked up a few tricks of the trade over the years with our Rig tarps, and we thought it would only be fair to share them with you.
So, without further ado, here are our favourite configurations from the limitless world of tarp. Click the images for detailed instructions.
Continuous Ridge Line

Why we like it
A classic: super simple if you have a tarp with riser attachment points, uses minimal hardware, and fits nicely over a hammock!
The Reflect Wedge

Why we like it
Ideal for bike packing: it’s quick and easy to setup, requiring little equipment, a small area, and no natural features. It provides wind shelter from two directions and you can light your stove just outside.
Buried Sand Bags

Why we like it
Stay cool on the beach, peg-free!
Kayak Bivvy

Why we like it
Minimal extra equipment needed: uses the Rig tarp’s stuff sack.
Van Attachment

Why we like it
Simple trick for extending your living area and creating a quick shelter, awning, or changing room.
Tuesday, 22 May 2018
13 WILDERNESS SURVIVAL KIT LIST ITEMS [YOU NEED TO PACK THESE]
13 WILDERNESS SURVIVAL KIT LIST ITEMS [YOU NEED TO PACK THESE]
Did you know the average person can survive up to 3 weeks without food… but only 3 days without water and 3 hours outside of their core body temperature? Knowing this, what to include on your survival kit list and carry in your kit can literally mean the difference between life and death in just a few critical minutes or hours.
The good news is, you can greatly increase your chance of survival…if you have the right supplies with you (and know how to use them).
In this post, we’ll explore 13 important survival items you’ll need to help you come out alive on the other end of disaster or should you get lost in the wilderness.
In theory, the more critical survival items you carry with you, the easier it will be to survive…
However, the flip-side to that is the more items you include on your survival kit list, the more bulk/weight you add to your person. Obviously, you can’t carry every wilderness survival tool you come across as it would quickly become impossible to transport them all. In fact, depending on the season and situation you’re in, you may not even need every item either.
But that said, there are some core survival essentials that you should always have available in your survival kit.
Here’s my take on 13 important survival items you need to pack (including a couple really important bonus items to consider):survival knife, fire starters
1. FIRE STARTER
Starting a fire in the wilderness is one of the most important things you need to be able to do if you’re to survive the cold, fight off hungry predators and cook yourself a meal. If you’re reading this, you probably already know you must be equipped with necessary fire starting skills and have a means of starting the fire. This is where a trusty fire starter becomes the number one critical survival item to have on you at all times.In fact, I recommend having at least three ways of starting a fire in your survival kit. You should not take chances with fire starters. I carry matches, a bic lighter and a striker. Supplement this by packing some tinder and other lighting aids such as InstaFire Fire Starter, too. I carry all my fire starters in waterproof containers and store them separately and within easy access in my kit.

2. SURVIVAL KNIFE
Chances are, you will need to do a lot of cutting chores in a true survival situation, and a good, reliable survival knife will be a perfect fit. Choose a high-quality survival knife or a multi-purpose tool with a knife. Your survival knife should be able to skin your hunt, cut strings, and sharpen sticks among other uses. The ideal survival knife must be strong and razor sharp to cut through the toughest materials with ease.The same principle of redundancy applies here as well. “Where there’s two, there’s one — where there’s one, there’s none.” Should your knife fail you or you lose it, you’ll definitely want a reliable backup. Check out the Ka-Bar Becker BK2 for a great, full tang knife that will last.

3. MAP & COMPASS
You should not rely solely on GPS when in a survival situation, but also carry with you a local map and compass to help navigate your way back to safety.It is good to have both a road map and a topography map on you just in case. These are lightweight and easy to pack, so there is really no reason not to carry these with you in your survival kit.
Having a map and a compass is one thing, however, you must also take the necessary steps to know how to read and navigate maps and use a compass. There are trainings and courses that can teach you the basics of these skills so you can practice on your own.
In case you don’t have a compass, Suunto makes a great one.

4. FIRST AID KIT
If you think you may need to head into the wilderness at a moment’s notice, be sure to have a first-aid kit on your person at all times.A first aid kit is a critical item that should be accessible at all times. Having a dedicated first aid kit for your vehicles is also a good idea.
General first aid kits can be a good place to start but be sure to supplement them with such items as pressure dressings to stop the bleeding in the event that injury may occur.
Adventure Medical Kits are a great place to start. Include a first aid pocket manual and familiarize yourself with it, especially if you aren’t formally trained or experienced.

5. A BOW SAW
A bow saw, as simple as it is, can make a survival situation on a cold night easier for you. Be sure to choose a durable, lightweight metal framed saw.
A bow saw can help you cut through logs and make firewood. It can also help you cut down big branches to make a shelter that your survival knife may have difficulty doing alone. If you manage to shoot a deer or big game, you will need to build a strong fire to roast your meat.
A bow saw not only gives you enough firewood, but also helps you set the fireplace for cooking your hunt.
6. PROPER CLOTHING
When you head into the wild, even on a hot sunny day, you need to plan to dress for the worst.
Hypothermia kills more people in the wild than any other cause. The cold of the night must not be countered with fire alone, but also proper clothing. Always layer your clothes, remembering to wear loose, layered clothing with wool as your under layer.
Stay away from cotton as a general rule. It retains moisture which makes it less insulating, harder to dry out and heavier on the body. This has been known to lead to hypothermia, pneumonia, etc. Clothes made out of synthetic and wool materials are recommended for this very reason.
7. EMERGENCY SURVIVAL WHISTLE
A plastic whistle kept around your neck is highly recommended just in case you get lost. Your voice might not reach far when lost, but blowing your whistle can help alert nearby people to your distress. Plastic whistles are recommended as they are lightweight, float and will not rust.

8. SIGNAL/HYGIENE MIRROR
There are heartbreaking stories where search helicopters have passed over lost people too weak to signal. A signal mirror or heliograph should be carried with you. Storing it in your first aid kit is a good way to protect it from damage and locate it easily. These lightweight, compact tools can reflect light at long distances signaling people far away of your distress.

9. CORDAGE
Cordage is a common name used to describe everything from a metal wire to a nylon string. Cordage is one of the most important survival items when you need to climb steep places, drag game you’ve killed, tie bundles of firewood and much more. Cordage serves many functions like a fishing line, cloth line, food line and much more. Lightweight but high-quality cord can make all the difference in a survival situation. Titan SurvivorCord is a very unique multi-purpose paracord used by Special Forces and comes highly recommended for its range of uses.

10. WATER / WATER FILTRATION
I said at the beginning of this article the average person cannot survive more than 72 hours without drinking water. Add to that, you need to plan on drinking at least 1 gallon of water per day. Even a few sips of clean water can mean the difference between life and death, but you want to be in peak performance when it counts, and that much water is too heavy to carry for anyone.Now, you can probably find some water in the wild, but it might also make you extremely sick coming straight from the source without proper filtration. Having a survival water filter with you can help a lot.Water filters are important regardless, but especially handy when on an expedition with a group of friends as you will go through water very quickly.
with you can help a lot.Water filters are important regardless, but especially handy when on an expedition with a group of friends as you will go through water very quickly.
11. FLASHLIGHT / TORCH
Few elements can disorient even the most experienced adventurer quicker than being shrouded in complete darkness. If you plan to venture out into unfamiliar territory or find yourself outside after dark, a reliable flashlight is a must have in any survival kit. The great news is flashlights have continued to get smaller and lightweight, and more efficient and effective in recent years. For one of my preferred flashlights, check out the Streamlight ProTac Penlight.

SURVIVAL KIT LIST ** BONUS SECTION ** :
Being in possession of the above critical survival items is just one step in surviving an emergency situation. You still need to know how to use them effectively. You need to be prepared in the best way possible to be able to survive for days. That said, two other critical elements needed to better your chance at survival are:
12. KNOWLEDGE
This can’t be stressed enough — You must know how to use every essential item in your survival pack in order to enhance your chances of survival. A good example is a map and compass. Having a map and compass will be of no help if you don’t know how to read it and navigate your way to safety.
Make sure you have a basic understanding of every item in your survival kit before you actually need them in a true-to-life survival situation. The best way to learn is to simply get comfortable with using the tools and equipment you assemble on your survival kit list. There are also many books and videos available for you to learn from as well. Just make sure the source of your information is from a legitimate expert that has the experience to back up their knowledge.
13. PHYSICAL & MENTAL FITNESS
Just like fitness is important for self-defense, it is also crucial when it comes to survival in the wild. You will be far better off if you are physically and mentally fit to endure the stresses of survival. Setting up a fire and building a shelter all the while staying upbeat and positive can be quite draining, especially when you’ve not had a proper meal. Being physically and mentally fit will only help better your chances of beating the odds.
CONCLUSION
I know that’s a lot to cover in one sitting, but nothing should be taken for granted when it comes to surviving in the wild. You need to have all the critical survival items, know how to use them and be physically and mentally fit to endure the demands of taking care of yourself. Your survival kit may contain more items than the ones we’ve listed, however, these are the critical ones that you should not overlook when considering space and weight.
Monday, 21 May 2018
A beginners guide to tarps
Tarp Shelters
I thought I'd write a bit about one of the most basic, overlooked and old fashioned bits of gear around, the simple tarp.
On trips I've always liked to sleep out on the ground or under improvised shelters of one type or the other, while it seems every single friend of mine has preferred a tent.
But in this day and age of ultra-high-tech, expensive, high-speed-low-drag, designer label, not-just-lightweight-but-ultra-light and over-complicated gear, I find it enjoyable and useful to get back to basics now and then.
After all, one of the reasons I enjoy the Green World so much is that it is an escape from the complicated world we humans have created for ourselves, and once in a while it's nice to leave the complications behind.
Certainly, I think it's a good idea that every outdoors-person should be well enough acquainted with this simple yet versatile piece of gear to be able to readily fashion one into a comfortable shelter in a short period of time.
I think it's a good idea to introduce young people just starting out camping to this type of shelter first. This gives them proper training and a grounding in shelter making basics, and accustoms them to sleeping in a more open environment, as I really think most peoples insistence upon tents is almost entirely psychological.
On trips I've always liked to sleep out on the ground or under improvised shelters of one type or the other, while it seems every single friend of mine has preferred a tent.
But in this day and age of ultra-high-tech, expensive, high-speed-low-drag, designer label, not-just-lightweight-but-ultra-light and over-complicated gear, I find it enjoyable and useful to get back to basics now and then.
After all, one of the reasons I enjoy the Green World so much is that it is an escape from the complicated world we humans have created for ourselves, and once in a while it's nice to leave the complications behind.
Certainly, I think it's a good idea that every outdoors-person should be well enough acquainted with this simple yet versatile piece of gear to be able to readily fashion one into a comfortable shelter in a short period of time.
I think it's a good idea to introduce young people just starting out camping to this type of shelter first. This gives them proper training and a grounding in shelter making basics, and accustoms them to sleeping in a more open environment, as I really think most peoples insistence upon tents is almost entirely psychological.
So what are some of the advantages of a simple tarp shelter?
Low Cost.
No other portable shelter is as inexpensive, which is a great advantage for young folk just starting out as well as refugees the world over.
Also, if one looses interest in camping, you haven't wasted much coin.
Low Weight.
Tarps are lighter then tents, sometimes much less so depending upon what material the tarp is made out of. This single fact alone is reason enough to make the tarp an ultra light backpacking favorite.
Cooking.
You can easily cook under one, A great rainy day advantage.
Camp fires.
Where appropriate , you can build a fire in front of one, which is nice in cold and wet weather,.
Of course you can build a fire near a tent, but those expensive nylon tents don't react well to flying sparks, and they don't concentrate the heat of a fire anyway. Burn a hole in a cheap tarp and all you have to do is simply patch it with duct tape.
A properly rigged tarp can reflect the warmth of a fire and create quite a cozy little sanctuary.
Closeness to Nature.
After all, this is why we're out there, isn't it? So why enclose yourself completely in a nylon envelope if you don't have to.
Under a tarp you can have shelter and still see the wind and rain, taste the air and see the stars. One is still part of the great outdoors.
Inside a buttoned up tent, you might as well be in your backyard.
Of course tarps are not perfect shelters. If they were tents would never have been invented.
The flip side of the tarp coin is;
Bugs.
This is perhaps the single biggest complaint of tarp shelters.
If the blackflies are so thick you get twenty calories of protein with every breath, or the mosquitoes so bad your hiking companions look pale from blood loss, then a tarp might not be the best idea.
Above The Tree Line.
It's nice to have a handy tree or two to string a tarp from. This is where the weight savings really shine.
Tarp shelters can be used in treeless areas of course, if you are willing to carry poles or spend some time looking for sticks.
But there are times when a true freestanding tent is called for, like crowded camp grounds or when a storm is trying it's level best to blow you off a mountainside, or really wet weather when the rain and wind is swirling around, constantly changing direction from every compass point, or when it's so cold out you need to conserve every last calorie of heat.
Skill.
Tarps take more skill to use. You have to know a few knots for one thing, and every time you set one up you have to decide how best to do so, taking into consideration the weather and the surroundings. You have to look for not only an nice flat spot with good drainage and no deadfalls ready to come down on it, but also handy trees, bushes, rocks or whatever to hang the tarp from. Which way is the wind blowing? Will it change direction after nightfall? Need to cut or find poles? With a tarp, taking advantage of natural windbreaks, dips in the terrain and so forth is far more important.
With a tent, you couldn't change things around even if you wanted to. All the design and engineering has been done for you, and all you do is assemble it, the same way you do every time you use it regardless of the conditions or location.
Well, with knowledge and practice comes skill., so let’s dig out a tarp and play.
The tarp I'm using here is from Harbor Freight. It's 9'6" by 7' 4" and cost me $6.99. According to harbor freight it weighs 1-3/4 pounds, but I didn't weigh it.
I think this is a decent size for a nice solo shelter.
If facing really bad weather or new to tarp shelters bigger is better, but inexpensive woven poly tarps are kinda heavy for their size. Something on the order of 8’ x 10’ seems like a good compromise.
Tarp, plenty of para cord, ground sheet, and eight stakes. Weight for the mess is just a tad over three pounds.

Three pounds isn't bad for the weight of even a solo shelter, but it really isn't any better than many solo tents. If we were using an expensive coated nylon tarp and simple plastic ground sheet we could cut a pound off this weight, and if one spent the coin on a Silnylon tarp we could really get the weight down. Still, this cheap tarp will do nicely for several seasons if well cared for, and you can outfit a whole scout troop for the price of a single solo tent.
This first pitch is sometimes called the diamond pitch. It's one of my favorites because it's so easy to do and really blocks the nasty weather.
So you find yourself walking along in high wind and maybe rain, and are fixin' for a break. This is so fast to rig there is no reason not to put up the tarp this way even for a lunch break.
Start looking for a likely looking tree with a flat spot before it.
Put your back to the wind and walk right up to that tree, and drop your pack, leaning it against the handy tree.
Open the top of the pack, and take out your tarp. Tie a corner of the tarp to the tree. Of course, you already have short cords tied to the corner holes in the tarp, so this is done without having to fumble cord out of the pack. Grab your bag of stakes out of the pack.
Now walk backward into the wind, pulling out the tarp as you go, and stake down the opposite corner of the tarp firmly.
Now the tarp is captive, and although it may flap a bit the battle is over. Now stake out the two sides of the tarp and you’re done!
Get under it, spread out the ground cloth, open your mattress pad and relax. Light the stove and cook dinner or lunch.
Like many tarp pitches, this probably works better with a square tarp. With a rectangular tarp such as this one side will be more open than the other.
Nothing to worry about, just angle the tarp so that side is a little more sheltered, and you put your stove there.
In really bad weather you keep the tarp pretty low to the ground. In better weather you can tie it higher to the tree for more head room under it.
It's more sheltered then it looks. What you get looks something like this -
This first pitch is sometimes called the diamond pitch. It's one of my favorites because it's so easy to do and really blocks the nasty weather.
So you find yourself walking along in high wind and maybe rain, and are fixin' for a break. This is so fast to rig there is no reason not to put up the tarp this way even for a lunch break.
Start looking for a likely looking tree with a flat spot before it.
Put your back to the wind and walk right up to that tree, and drop your pack, leaning it against the handy tree.
Open the top of the pack, and take out your tarp. Tie a corner of the tarp to the tree. Of course, you already have short cords tied to the corner holes in the tarp, so this is done without having to fumble cord out of the pack. Grab your bag of stakes out of the pack.
Now walk backward into the wind, pulling out the tarp as you go, and stake down the opposite corner of the tarp firmly.
Now the tarp is captive, and although it may flap a bit the battle is over. Now stake out the two sides of the tarp and you’re done!
Get under it, spread out the ground cloth, open your mattress pad and relax. Light the stove and cook dinner or lunch.
Like many tarp pitches, this probably works better with a square tarp. With a rectangular tarp such as this one side will be more open than the other.
Nothing to worry about, just angle the tarp so that side is a little more sheltered, and you put your stove there.
In really bad weather you keep the tarp pretty low to the ground. In better weather you can tie it higher to the tree for more head room under it.
It's more sheltered then it looks. What you get looks something like this -
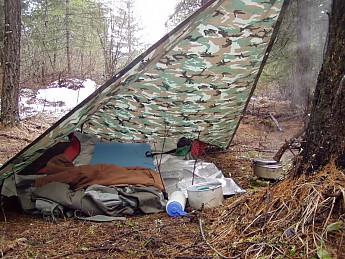
Next, we should mention one of the oldest and most basic pitches, the simple A pitch.
This is simplicity itself. Just stretch a rope from two handy objects, throw the tarp over and stake it out.
With a well tensioned rope and eight stakes, this is perhaps the sturdiest pitch there is, and it probably provides the best shelter.
One open end can be mostly closed simply by pitching that end of the tarp real close to a big tree or bush. The opposite end can be blocked with your pack or rain gear as needed.
It is nine and a half feet long though, so little rain will blow in and reach you.
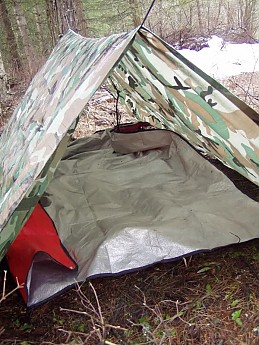
What this doesn't have is much head room, so it's better for sleeping then for cooking or other camp chores.
Recently I slept under a tarp like this with my three nephews. Two people per opening, and our feet met in the middle. It worked very well and was a very simple and lightweight way to shelter four people.
This is simplicity itself. Just stretch a rope from two handy objects, throw the tarp over and stake it out.
With a well tensioned rope and eight stakes, this is perhaps the sturdiest pitch there is, and it probably provides the best shelter.
One open end can be mostly closed simply by pitching that end of the tarp real close to a big tree or bush. The opposite end can be blocked with your pack or rain gear as needed.
It is nine and a half feet long though, so little rain will blow in and reach you.
What this doesn't have is much head room, so it's better for sleeping then for cooking or other camp chores.
Recently I slept under a tarp like this with my three nephews. Two people per opening, and our feet met in the middle. It worked very well and was a very simple and lightweight way to shelter four people.
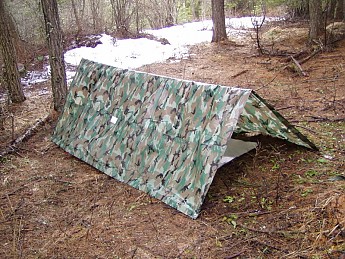
Not much headroom, but pretty cozy in there
-
-
What if you find yourself in open terrain without any trees handy? Well, you’ll have to find a stick or two.
For a one-stick pitch, stakeout one long edge of the tarp first. Then lift the center of the opposite long edge with the stick, and hold it upright with cord and a two stakes set in a V. I think of this as the Pyramid Pitch.
With this particular tarp there is no center grommet, so I cheated and my pole isn't centered, so one side doesn't reach the ground.
I may have to put a new grommet in the center of this tarp and experiment more with this pitch, it looks promising, but to be honest I’ve never spent the night under this arrangement
For a one-stick pitch, stakeout one long edge of the tarp first. Then lift the center of the opposite long edge with the stick, and hold it upright with cord and a two stakes set in a V. I think of this as the Pyramid Pitch.
With this particular tarp there is no center grommet, so I cheated and my pole isn't centered, so one side doesn't reach the ground.
I may have to put a new grommet in the center of this tarp and experiment more with this pitch, it looks promising, but to be honest I’ve never spent the night under this arrangement
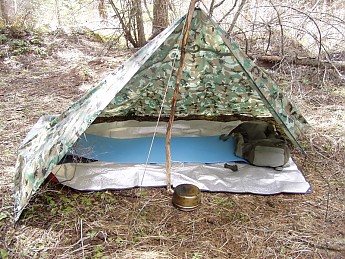
One long, sturdy stick can also be used for the diamond pitch show at top, and with two sticks and plenty of cord and stakes or other things to tie the cords off to, one can also manage an A pitch. The A pitch is by far the hardest to do without trees though, because the ridge line needs to be pulled very tight for it to be sturdy, and your end sticks will want to fall over unless staked or tied up very firmly. When using sticks I’d stay with some sort of one-stick pitch unless I had lots of practice first.
Now we come to an oldie but goodie.
This is the lean-to pitch.
Using a cord suspend one long edge between two trees.
Pull the tarp out at a 45 degree angle, and stake down the opposite side.
I modified the pitch here, and folded one side over for a corner.
This is the lean-to pitch.
Using a cord suspend one long edge between two trees.
Pull the tarp out at a 45 degree angle, and stake down the opposite side.
I modified the pitch here, and folded one side over for a corner.
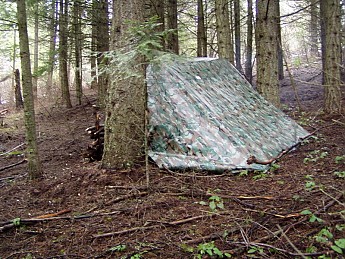
This pitch is more open than the others but it is an all-time favorite if you are in an area where you can build a fire.
With a bright fire before the tarp the heat is nicely concentrated by the tarp and it's very warm.
The little wall behind the fire not only reflects some heat, but helps create a backdraft and keep the smoke out of the shelter.
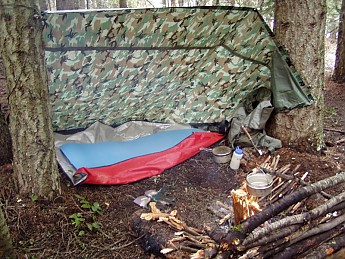
Ah, this is the life. Now all camp chores can be done sheltered and warm. It was so comfortable here relaxing with my boots and coat off that I almost fell asleep.
Then the wind changed...
As I was relaxing the gentle breeze picked up and changed direction. The shelter filled with smoke. No worries, you have to be philosophical about this sort of thing.
Ah well, nothing is perfect.
I rolled over and faced the back of the shelter where there was no smoke. My eyes closed...
And a flash lit the shelter, clearly visible though my closed eye lids!
Huh? someone taking a picture with a flash?
KABOOM!!
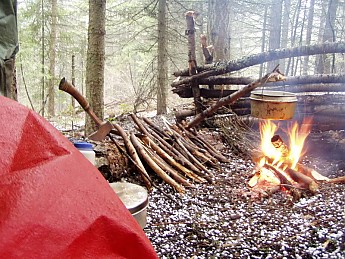
Nope. That was thunder, and close by! The lighting struck, the thunder boomed, and marble sized hail stones came down in a torrent and bounced all around.
I pulled the edge of the ground cloth over me to keep off the ricochets.
Camping with a tarp shelter I think it is a good idea to use an oversized ground cloth that can go around your sleeping bag!
So I lay there before my fire and watched the storm, warm and comfortable, with the whole forest open before me.
Nope, you don't get a view like that in a tent.
You can spend allot of coin on fancy modified tarps. They look like bat wings, A frame tents without the walls, pyramids with a central pole, and just about every shape imaginable. Although they certainly are lighter than a woven poly tarp of equal size, are they really any better shelters?
Properly setup and used, they all will keep you dry in a rainstorm and let you cook a meal over your stove. None will protect a person from bugs, and that is the biggest complaint I hear about tarp shelters, and none will match the versatility of a simple square or rectangular tarp, once you learn to use it properly.
OK everyone, let’s see your tarps and hear your tarp-ing stories!
Sunday, 20 May 2018
Bivouacking in an emergency on the mountain – Tutorial (29/29) | LAB ROCK
Great advice to have stored, just in case..!
Saturday, 19 May 2018
The key to successful bivouacking
The preparation for your bivouac starts well before you pitch your tent in
the countryside!
Regarding the choice of equipment, the preliminary information and the
practical advice,
this step-by-step guide will help you enjoy your future outdoor overnight
stays safely.
Sleeping in the mountains is a very enchanting experience. In order to ensure
that your outdoor nights
are as pleasant as possible, here are the key steps to a successful bivouac!
Safety cannot be separated from the preparation process for a mountain
bivouacking excursion
Like camping, there are a number of safety principles and laws associated with
Like camping, there are a number of safety principles and laws associated with
bivouacking Several days
before your departure, we recommend the following:
Check the weather forecast for your destination site.
Make enquiries about the applicable regulations: off-grid camping is highly
Check the weather forecast for your destination site.
Make enquiries about the applicable regulations: off-grid camping is highly
regulated and you cannot just pitch a tent wherever you want.
Check your equipment: if you have not used your tent for a while, it is well worth
pitching your tent in order to remind yourself about the procedure and check
whether there are any missing elements.
Everything, including tent pegs, poles, emergency repair kit, utensils for your
cookset and your groundsheet, must be checked with a fine tooth comb.
The choice of location: very important for ensuring a safe bivouac!
Choosing the right location is essential for making the most of the pleasures
of outdoor living. What is your golden rule? Always put the safety before the
beauty of the landscape. The location of your bivouac must be:
a neutral area, that is far away from any cultivated fields (potential movements
of machinery at dawn, damage to seedlings) or areas with animals
(faeces, ticks, etc.) or rivers (rising moisture, insect populations).
a flat piece of land, not only to avoid slipping during the night, but also to ensure
as much comfort as possible and guard against the formation of a puddle
should it rain. Branches and stones located beneath the sleeping area must be
removed.
a surface that is sheltered from wind: in order to avoid any damage caused by
strong winds or storms, which can pick up at night, it is advisable to pitch
your tent facing the mountain. This will prevent ascending gusts of wind from
striking the sheet with full force. A common error is not taking into account
the katabatic wind, which comes from the mountaintops and is caused by
the cold air dropping down the slope. Under the effect of gravity, the gusts
can reach particularly high top speeds.
Our tips for a luxury night spent outdoors:
In the mountains, certain details can sometimes make all the difference. Here are
a few practical recommendations that have been tried and tested many times.
Having one torch per person in order to ensure the safety of everyone's movements.
Having an additional water bottle in order to put out the embers of your campfire
Having one torch per person in order to ensure the safety of everyone's movements.
Having an additional water bottle in order to put out the embers of your campfire
when you go to sleep.
Protecting yourself from the cold at night, which can be quite extreme, even in
summer. A good mattress and a suitable sleeping bag (mummy bags, for example,
provide excellent coverage of the body) should do the job. In winter, we recommend
that you place an insulating foam groundsheet underneath your inflatable mattress.
Protecting yourself from the dew at dawn, particularly when bivouacking in the open air.
A waterproof and breathable overbag can prevent this type of inconvenience.
For extra comfort, you can add a liner
Do not arouse the sense of smell of the surrounding animals by leaving leftovers of
your meal near to the tent. Cleaning the cookset and securely storing the provisions
will ensure you have a peaceful night
Make sure that you can make coffee at dawn by slipping your gas cartridge into
your sleeping bag at night.
This advice will prevent the gas from freezing overnight!
Once you have had a good rest and have eaten properly, you'll be ready for
Once you have had a good rest and have eaten properly, you'll be ready for
another fantastic hike!
Subscribe to:
Posts (Atom)
Wild Camping Tips and Kit List
The first rule of Wild Camping club is... actually really simple! Leave No Trace: if you take it in, you carry it out. What is wild camp...

-
The first rule of Wild Camping club is... actually really simple! Leave No Trace: if you take it in, you carry it out. What is wild camp...
-
How to Start a Campfire: Ultimate Guide Me make fire. Fire good. Fire bring warmth and cook food. Our relationship with fire spans back...


