
Tuesday, 31 July 2018
Monday, 30 July 2018
How To Build An Upside Down Fire
How To Build An Upside Down Fire

This past weekend The Bug Out Bag Guide Family hosted a barbecue for some close friends. One of the highlights of this was testing out an alternative fire building method in our back patio firepit. Instead of building a standard teepee or log cabin we decided to try building what is called an “upside down fire”. We got some great, hassle-free results from this that we wanted to share with you. As I always say, it is always good to add new techniques to your survival skills. At the end of this article you will know how to build an upside down fire on your own!
Why build an upside down fire?
Over many years of camping I have built hundreds of fires. These were mostly of the teepee and log cabin variety, with some lean-to fires mixed in as the situation required. These fire building methods have served me well and I have enjoyed many a meal and evening sitting around their warm glow.
I was excited to learn about a new method of fire building and try it out for myself. What I learned from my test run, is that there are several advantages that an upside down fire brings to the table.

An upside down fire is self feeding
An upside down fire is built in a layered fashion starting with tinder at the top and increasing in size all the way to large logs at its base. One of the biggest advantages of using this fire building method is that as a layer burns it progressively ignites the larger layer below it. The tinder lights the kindling, which ignites the fuel wood, which in turn lights the logs. In other words, once an upside down fire is lit it will burn by itself for hours. There is no need to baby sit it and keep adding wood over time! You can light your upside down fire and then focus on other tasks like setting up camp, preparing food, or just relaxing with your fellow campers.
While traditional fires (teepee and log cabin) do progressively ignite successive layers (if properly built!) they tend to do this over a shorter period of time and require that a fire tender monitors the burn rate and add more fuel and eventually place logs onto the fire. The genius of an upside down fire is that it frees you from this chore!
Being self feeding makes an upside down fire an excellent choice if you want to keep a heat source burning through a long, cold night. As it is self feeding you will be able to build it before bed, light it, and then keep warm without having to climb out of your sleeping bag or shelter.

An upsidedown fire generates lots of coals
As an upside down fire burns it creates a large supply of coals from the logs integrated into the base of the design. These logs are lit as the flame consumes the fuel wood and transfers heat down to this base layer. These coals are excellent for most cooking purposes. With a good bed of coal you can:
- cook foil packets
- heat up a dutch oven
- barbecue meat, fish, or vegetables
- and much, much more…
With a traditional fire you would need to set up your teepee or log cabin and as they got burning need to continually feed it larger and larger logs to get a nice bed of coals going. The upside down fire does this automatically with the same amount of wood but far less active management. Set it up, go get your food ready and then come back to a nice bed of cooking coals!

Where can I use an upside down fire?
An upside down fire can be used pretty much anywhere you would build a traditional fire. It can be a great option for many applications:
- Survival cooking
- Camping
- Bonfire
- Barbecue
- Wood Stove
- In home fireplace
- Rubbish disposal
Can I build an upside down fire in a fireplace?
Yes! People often build them in fireplaces or woodstoves for the same reasons why they are used outdoors. Wood stove enthusiasts actually favor the upside down fire building method as it tends to heat up the chimney pipe faster than a traditional fire and by doing so increases the stove’s efficiency.

How to make an upside down fire
Here is a step by step guide for building your own upside down fire. Follow the written instructions and refer to the pictures if you run into any trouble.
Step 1: Clear your fire pit
You are going to lay your base layer of logs down in the next step so you will want your pit clear of debris and as level as possible so the fire you build will not topple over as you build it up.

Step 2: Lay down the base logs
You are going to build your base layer first. This means use the largest logs you intend to burn and lay them down parallel to each other. Have the logs all touching each other so there are no gaps between them and it is best if the tops of them are relatively level with each other so you will have a nice sturdy base to build the rest of your fire upon.

Step 3: Thicker Fuel Layer
You are going to use large fuel wood for this layer, larger than your thumb. Remember, this layer has to be large enough to generate enough coals and heat to ignite the logs below it. Lay this wood in the opposite direction to the logs below it and allow space between each piece for air to flow. Feel free to build 1-3 layers of this sized wood if you have enough and if you have organized your wood build each layer upwards out of slightly smaller thickness pieces. Each layer should be laid down crosswise (perpendicular) on top of the layer below, similar to the method used when building a log cabin.
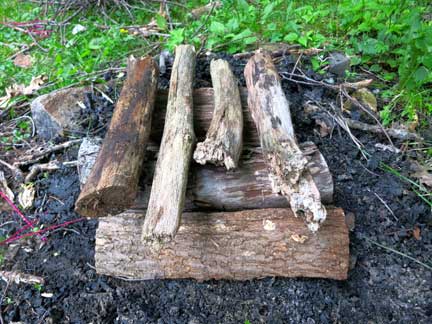
Step 4: Smaller Fuel Layer
You are going to repeat the process used in step 3 here but using smaller fuel wood, preferably smaller than your thumb in thickness. Once again build 1-3 layers of small fuel wood up with each being perpendicular to the last layer and slightly smaller thickness. You should have a small tower of wood now with the thickness of pieces used getting gradually smaller as you get nearer to the top.

Step 5: Kindling
Now you are going to start adding on the smaller wood that you have, kindling that is thinner than your pinky. Add 3-5 layers of this if you have enough to do so. By the time you get to the top layer the wood should be of the smallest thickness you have, no bigger than a twig. Stick to the same method of laying each layer down crosswise across the layer below it to allow proper air flow.


Step 6: Tinder
Choosing and adding your tinder is a crucial last step. You need something that is small enough to be ignited with your match, lighter, or firestarter but that will burn long and hot enough to get your kindling to start burning. Place this tinder on top of your kindling. Here are some suggestions for kindling that have worked well for me in the past:
- Dryer lint
- Birch bark
- Paper
- Cardboard
- Commercially available firestarters
- Cotton balls soaked in vaseline
- Bird’s nests
- Dry Grass
- Coconut husks
- Pine needles
- Punk wood
- Cattail fluff

Step 7: Light And Enjoy!
Shelter your match and tinder from any wind (If you are lighting your fire with an EverStryke Match, you don’t need to worry about this) and get that fire started. Depending on what tinder you chose you may need to blow gently to get the tinder going. As the fire burns each layer that you built should ignite the next one down all the way to your base layer of logs. In my testing an upside down fire built as I have described should burn for well over an hour and result in a large layer of coals all ready to cook your meal. Enjoy!

Your Turn!
So, now you know how you build your own upside down fire. I encourage you to give it a try next time you are camping or setting up a backyard bonfire. It is a great tool to add to any fire building arsenal and I think you will be impressed with the results.
Sunday, 29 July 2018
Primitive Fire Making – 6 Ways To Make Fire Without Matches
In a survival situation being able to start a fire can mean the difference between life and death.
Hopefully your bug out bag or survival kit has the fire starting tools that will help you start a fire quickly and reliably. But what if this gets wet, lost, or used up? Then you will need some primitive fire skills to build your fire. Primitive fire making is a bushcraft disciplinethat uses simple tools and natural materials to create fire.
By being able to make fires quickly and effectively in any weather conditions, you will be better prepared for emergency situations. In this article I am going to show you how to start a fire using primitive skills as well as compare and contrast the various methods to help you decide which one is best for you to learn first.
CONTENTS [HIDE]
Primitive Fire Making Techniques
Flint and Steel
This is the easiest of all bushcraft fire starting methods. All that is required is a flint and a piece of carbon steel (such as your survival knife). Flint and carbon steel should be a part of every wilderness survival kit as it will allow for easy primitive fire starting in virtually any conditions:
- The friction formed by striking the steel against the flint will form sparks.
- You want to strike the steel against the flint with a loose wrist. It may take a bit of practice to get the technique down.
- Have tinder ready to ignite as the sparks start to fly from the flint.
- Gently blow on the sparks that land in the tinder or char cloth until it ignites.
- Make sure you have your kindling nearby and ready to add to the tinder once it catches.

This method of bushcraft fire starting is relatively easy to execute. It requires the least amount of physical strength and energy to perform and can be done with only two items. We recommend the SurvivalSPARK Emergency Magnesium Fire Starter as a trusty flint and steel tool. However, if find yourself in a situation without carbon steel or a flint available, which is why it’s important to know as many primitive fire making techniques as possible. This will better perfect your wilderness survival skills, preparing you for all situations. Here is a video that shows you how to find flint in the wilderness:
Fire Plough
This is the simplest form of primitive fire making using only natural materials. It is essentially an optimized way to “rub two sticks together” with the base board being one and the plow stick being the other.
Start by procuring a flat piece of hardwood at least a couple of inches thick to use as your baseboard.
- On the flat side, cut a straight line down the center using your survival knife.
- Hollow out this line to create a shallow, thin groove, about ¼-inch wide.
- Find a softwood stick, at least 1-inch thick. Use your bushcraft knife to carve the end of the stick to a rounded point, with the tip being small enough to fit into the groove on your board.
- To cause enough friction to generate sufficient heat to ignite a fire, we will now rub the two crafted parts together.
- Applying continuous force, rub the stick through the groove in the wood, starting at one end and going toward the other.
- This will require a bit of strength in order to create the friction necessary to form a spark.
- As the stick rubs against the baseboard, wood will slowly shave off.
- The friction you are causing will create heat and tiny embers, which will ignite the wood shavings.
- Have your kindling ready and, as before, gently blow on the sparks within the tinder to ignite a flame.
The fire plough method of primitive fire making is simplistic in design, allowing it the versatility to be applied in virtually any location. It’s an ideal wilderness survival tactic due to sheer simplicity.
Nonetheless, it does require quite a bit of physical force and energy to create the spark, someone who is weakened by starvation or exposure may have difficulty getting the fire plough to work. As with all primitive fire starting methods it is essential to practice in order to perfect the technique. Here is a video demonstrating the fire plough method:
Hand Drill
A hand drill is a bushcraft technique that is simpler to build than the bow drill, but it will require greater energy, patience, and skill to implement. All that is required is a drill and a fireboard. The stick being used for the drill is spun between two hands (instead of using a bow to spin the drill) to generate enough friction to create embers.
- In the same way as the bow drill’s drill was constructed, find a softwood stick and carve one side to a rounded point.
- Cut a small hole in the softwood fireboard, about an inch from the edge of the board.
- Cut a v-shaped notch connecting the hole and the edge of the board, with the point of the v connecting with the hole.
- Fill the v-shaped notch with tinder. Position the point of the drill into the hole on the fireboard.
- Place both palms flat on either side of the drill. Press your hands in firmly, and rub them back and forth. Apply downward pressure as you spin the drill for added friction.
- Continue to spin the drill in the fireboard until smoke and embers form.
- As with the bow drill once the embers start to make the tinder smolder gently blow to develop a flame.

This method is easy to construct in a pinch, making it a valuable bushcraft skill. Be sure to practice often because it can be difficult to implement. Persistence and endurance are required to make it work. Here is a video showing the hand drill fire starting method:
Bow Drill
This method is more complicated to build than either of the previously mentioned methods. However once a bow drill is built it requires less exertion to create a usable ember. Lets take a look at how to build a bow drill fire starter:
- Start by finding a piece of hardwood, rock, or bone that contains a divot or shallow depression. This will serve as the socket that the drill rests in.
- Next, find straight stick that will serve as your drill. The drill will need to be a piece of hardwood about ¾-inch thick. One end should be blunt and the other end will be chiseled to a rounded point.
- Make a flat piece of softwood, at least 1-inch thick, to use as a fireboard. Cut a tiny hole into the board, about one inch from the side, barely big enough for the tip of the drill to rest in.
- Cut a triangular notch connecting the hole to the side of the board, with the point of the triangle connecting to the hole in the board.
- Find a bendable, green stick to craft into a bow.
- Tightly tie a piece of sinew or paracord to the bent ends of the bow.
- Place your tinder into the triangular notch in the fireboard in step 4. This is where the sparks will form.
- Place your foot firmly on the fireboard to hold it in place. Loop the bowstring around the drill and place the point of the drill into the hole in the fireboard. Grab your socket from step 1, and place the depression in the socket on top of the drill to hold it firmly in place.
- Pull the bow back and forth rapidly. As you do so, this will drive the drill into the wood, creating friction.
- As the embers begin dropping into your tinder nest, gently blow until it ignites.

Although a bow drill is more difficult to build than a fire plough it should create fire faster and with less effort. If you are able to make your tools you can use them multiple times, making your investment pay off again and again. Here is a video demonstrating the bow drill technique:
Pump Fire Drill
The pump fire drill is the most difficult to construct of all the primitive fire starting tools. This is due to its more mechanically complicated nature. This is compensated however by requiring nearly no effort to generate embers and a fire once the pump fire drill is constructed. Lets take a look at how to build one:
- Find a round piece of hardwood and cut a small hole in the center. Using sinew, cordage, or paracord attach a sharp rock or arrow to the end of a hardwood stick.
- Drill a hole through a rock at the same width of the stick, and push the stick through the hole, with the arrow resting about one to two inches below the rock. The rock should fit snugly, without moving.
- Find a slightly curved piece of hardwood and drill a hole through the center, the same width as the stick.
- Insert the curved piece of wood onto the stick, an inch above the rock, so the bow in the wood is facing upward. It should fit loosely so the device will easily rotate inside of it.
- Etch two notches on the ends of each side of the bowed wood so that a string can be tied around easily. Tie a piece of sinew, cordage, or paracord to connect the edge of each side of the bowed wood to the tip of the stick, in the direction away from the arrow.
- Grab the bow wood as a handle. Press the arrow to the hole in the firewood and spin the device to wind it up.
- Allow the device to unwind itself. As the arrow is driven into the fireboard, embers will form.

This bushcraft fire starting technique requires almost no effort to create a fire and is great for people of smaller stature and strength. However, the pump fire drill itself will take some time to build so it should be practiced or built ahead of time and then brought out when needed. Here is a video showing the pump fire drill technique:
Fire Piston
The fire piston is a primitive fire starting technique that is a bit more complicated to make, requiring the use of hardware to build. The fire piston uses the pressure created by quickly ramming the piston down a chamber to generate enough heat and pressure to ignite a piece of charcloth or other tinder.
- You will need a piece of copper or strong plastic pipe about 10 centimeters long. Sand the ends so they are smooth.
- Plug one end using a brass end cap, piece of metal, or wood. Glue the cap on so it fits snug.
- Take a 10-millimeter thick wooden piston and cut it so that it is a couple of centimeters longer than the tube.
- Insert the piston into a power drill. Run a file on the end of the piston, a couple of millimeters from the end and run the drill until the file carves a smooth indented line around the piston.
- Insert a 10-millimeter rubber ring around the ring in the piston. Drill a 5-millimeter hole into the end of the piston on the side with the rubber ring.
- Apply a thin layer of glue to the end of the piston to clog the pores of the wood. Drill a 10-millimeter hole into a cylindrical wooden knob and glue the bare end of the piston into the knob.
- Fill the hole at the end of the piston with charcloth.
- Lubricate the rubber ring and insert the piston into the copper tube. Forcefully push the piston into the tube quickly, pulling it back out immediately.
- Do this repeatedly until the charcloth ignites, then transfer the ignited charcloth to your tinder.
While the fire piston method does require some effort to build, creating a fire with it is incredibly easy. Although it can’t be built out in the woods with simple tools it is still useful to learn. Once a fire piston is built it’s a light weight and compact addition to any fire starting kit.
Bonus Method: Fire Starting Tools You Can Depend On
While primitive fire starting is a huge asset in your survival skill set, being prepared with the right tools can make your life a lot easier.
I recommend the SurvivalSPARK Emergency Magnesium Fire Starter as mentioned above. It is a fire starting tool that you can count on getting a fire started quickly in an emergency situation.
The other interesting survival fire starter worth checking out is the Everstryke Pro Waterproof Emergency Lighter which integrates a wick and striker wheel in a small waterproof housing.
What is the Best Primitive Fire Making Method?
In an ideal world we could just go out and master all of these 6 techniques and be ready to build a fire no matter the circumstances. However not everybody has time to master all these survival skills. What I suggest is picking one, or 2 at most and practicing it until you can create a fire using it in your sleep. Picking which method to learn comes down to several factors including:
- What resources are available
- How much time you have
- How much energy you want to expend
Feel free to try out all 6 methods to find which is the best for you. Once you have that figured out practice, practice, practice. The time invested improving your primitive fire starting skills will pay huge dividends if you ever need to start a fire without matches. Always remember, Chance Favors The Well Prepared.
Thursday, 26 July 2018
Kids prepping skills
Kids prepping skillsPrepping skills to teach your kids

Survival skills your child should knowKids are in a habitual state of learning, just by being kids. By
nature, skill building is in their bones and so it's easy to teach
your kids prepping skills so that in the event of an emergency
they are not victims, but active participants in their own
survival.
Don't coax your kids into the world of prepping, but simply to
give them some background and provide essential prepping skills for their survival. As the children grow, you can build on
the skills taught so they have a fighting chance in the event
you are not able to lead them through the emergency. Skill
building will give them a sense of independence and self-
reliance. Below are dozens of prepping skills and activities to
teach children...
Prepping skills to teach your kids
Prepping Skill #1: Teach kids water survival skills.Water is life, which is why ultimately it's important to teach
kids how to locate water, how to open a bottle of water, and
how to filter water.
Water is compulsory to survival and yet an overlooked detail.
The seal of water bottles is often too tight for young children
to open by themselves; however, with the aid of a grip as
leverage your child can break the seal. Be sure to provide the
whereabouts of your water filtration gear and offer a simple
demonstration to your child on water filtration.
Expressly, show your child how to add more water to the Big
Berkey water filter, how to use a Lifestraw or water purification
tablets, and how to tap the water reserves. Most importantly,
provide clear instruction to kids of water which is unsafe to
drink, such as flood water or pool water which has not been
filtered. Not sure yourself about the water?
- Here are Seven Survival Lessons about Water.
While you're at it: teach the kids how to swim in water!
Prepping Skill #2: Teach kids to use a manual can
opener.For some kids it's a physical challenge to open a can, but it is
comforting knowing your child can do it. Explain how anything
inside the can is safe to eat without cooking (even though it
might not taste as good). Kids need to know also about can
safety. For example, they must not to eat from cans that are
bulging, dented, or corroded (because of botulism risks) or cans
that otherwise compromised, such as cans in floodwaters or
cans which may have rat droppings or urine on them.
Prepping Skill #3: Teach kids to light a match.Parents often hide the matches from their kids, Provide
supervised instruction on lighting a match into a bucket of
water. Be sure to discuss the safety and importance of tying
hair and loose clothing. Most kids know the stop, drop and roll
method of extinguishing flames to clothing: quiz your child and
have him or her demonstrate knowledge!
Firebuilding is one of the most fundamental skills to teach your
kids, and it starts with lighting a match.
Prepping Skill #4 to teach kids: build a basic fire.There are many prepping skills to teach your kids, but one of
the most fundamental skills you can teach a kid is to start a
fire (and to put one out). Kids will want to dump water on the
fire, but they should sprinkle it out.
Schools often do a good job of holding fire drills to teach kids
about fire safety, but they don't teach kids how to build a fire.
That's the job of a prepper! As your child's guardian and as a
prepper, you must instill a healthy respect of fire. This
understanding will teach your child more about fire safety than
his peers may know.Here's how to build a healthy respect for
fire...
It doesn't matter the firebuilding method you choose as long as
you provide a lesson on firebuilding. Discuss the importance of
a fire ring for containment and the proper tools such as having
a bucket of water on hand. Physically show your child tinder
(fluffy stuff they can touch with their fingertips), Kindling (bits
of twigs they can bunch in one hand), and Fuel (logs they can
carry under the arm).
Prepping Skill #5 to teach kids: how to stay warm.You may not be ready to teach your child how to operate the
cook stove, but does your child know how to run the generator?
Older and highly responsible children may graduate to lessons
on how to safely slit wood with an axe to help fuel the fire.
Prepping Skill #6: to teach kids: how to handle a
knife.Teach kids how to use a knife safely to cut food (so they don't
cut off their fingers). Give your child a scouting pocket knife
and teach him or her how to whittle.
Prepping Skill #7: Teach kids: bartering.Have your child make do with available resources and learn the
art of bartering. Bartering is not only a prepper skill, but a
- Watch the video "One Red PaperClip" which provides all the inspiration you need. When you watch the video you will understand how one young man took one red paperclip and traded up until he was able to get himself a house. It's an amazing story and worth sharing with everyone you meet. Many famous people have said it, including Tennis Player Arthur Ashe.
Prepping Skill #8: Teach kids to ride a horse or bike.Your budding little equestrian may have learned a thing or two
at horse camp which would help an end of times EMP scenario.
Perhaps your child may someday need to ride to the closest
town get medical help.
Any kid should learn how to ride a bike, as it just may be the
bugout vehicle!
Prepping Skill #9: to teach kids: Basic navigation.Provide your child with basic navigational information about key
landmarks in your area along with a general idea of North,
South, East and West. If your child attends a public school,
officials will likely not release your child to walk home alone
following a disaster; however it's a good idea to have a
contingency plan. Does your child know the route home to
safety? Take a family hike and walk or bike home from school.
After completion, graduate to a night walk! In the event of a
catastrophe, does your child know the route and alternate
routes to a family meeting place in the event your home no
longer exists?
Prepping Skill #10 to teach kids: Self defense.Martial arts is very suited for children, and it helps build self-
confidence as well if you are not ready to teach the kids about
firearms.
Prepping Skill #11 to teach kids: Security.Firearms training for kids might not be right for every family,
but you can certainly teach your child to target as with archery,
sling shots or a home made bow and arrow. Other options
might be paint ball or BB-guns. These skills will also be useful
for hunting.
Prepping Skill 12 to teach kids: Hunting, fishing,
archery.Teach kids how to use fishing poles and equipment, plus sling
shots, BB guns, archery for small game hunting.
Prepping Skill #13 to teach kids: Simple first aid.Scouting handbooks provide basics for young children. Red
Cross also offers many classes. As well, you can teach the
basics of cleaning a wound and apply the proper dressings and
bandages. You can also practice making an arm sling from a
large sheet (tying and arm sling is more difficult than it appears.)
Prepping Skill #14 to teach kids: Going incognito!Keeping quiet is an important prepper skill. Teach your children
all the safe spots to hide on your homestead. American Sign
Language is fun to learn and may prove extremely useful if
gangs threaten the homestead as a family could instruct one
another silently to plan an attack or escape.
Prepping Skill #15 to teach kids: Communications.Give the kids a two-wave radio and show them how to operate
and load the batteries. Teach your children some family safe
words or learn American Sign Language as a family to be able
to communicate silently.
Prepping Skill #16 to teach kids: Crafting with
Paracord.You'll find a variety of paracord kits available to help kids get
into crafting with paracord, such things as survival bracelets,
belts, and lanyards. Boys and girls will appreciate the skill and
you'll feel good knowing they have a good way of spending
their time. Learn more about paracord as a hobby.
Prepping Skill #17 to teach kids: How to use a
bandanna.Every scout has a bandanna or two and with good reason.
- We've compiled a list of 32+ uses for a bandanna, you'll have fun teaching the kids about bandannas.
Prepping Skill #18 to teach kids: Saving money.Make a mason jar coin banks and teach the value of a penny
saved is a penny earned. Kids will enjoy it if you glue a small
plastic figure on the inside of the jar. As coins fill the jar, the
figure disappears. The slitted mason jar cap, pictured
immediate right, gives you a head start.
Prepping Skill #19 to teach kids: Forage for food.Take a walk in the neighborhood with the kids to find food in
the wild or planted by man. Perhaps you'll spy onions,
pomegranates, apricots, oranges within reach in neighboring
gardens. Knowing how to recognize food is a skill. You may like
to teach the kids that good times we pick with permission, in
starvation times we do what we can to survive.
Prepping Skill #20 to teach kids: Sewing, knitting
and crocheting.All are valuable skills to fix things and make new ones.
Extremely gifted children enjoy these skills in particular as it is
enriching beyond textbook studies.
Prepping Skill #21 to teach kids: Camping.Take the kids camping, or set up a backyard camping
adventure. Teach kids how to pitch a tent, wash the dishes,
tend to the fire, and cook outdoors.
Prepping Skill #22 to teach kids: Gardening.Kids love getting dirty and what better way than to teach
gardening. Small farm gardening, windowsill or greenhouse
gardening, or Aquaponic Gardening.
- Radishes are extremely easy to grow and they can appear as quickly as 18-21 days. Try growing radishes with kids.
- Sprouts also have a short window for growth, which make them an excellent project with kids.
Prepping Skill #23: Solar Cooking.Teach kids the science of cooking with the sun using the solar
cooker science kit right. Have fun cooking a hot dog from
cardboard after constructing the simple and fun to use kit for
kids. Adults will have just as much fun. Try solar cooking with
the scouts or as part of a homeschooling projects!
Prepping Skill #24: Construction.Does your child know how to safely hit a nail with a hammer?
Teach your children how to safely use all the equipment in your
garage.
Prepping Skill #25: Safety awareness.
- Alarms: Make sure your child knows the difference between a smoke alarm and the burglary alarm.
- Drills: Your kids may hold regular fire drills, earthquake drills, tornado drills or hurricane drills at school, but do they know the routine at home? In case you have a sitter or guests in the home, they can help show the way to safety. Regular drills are part of everyday preparedness. As a prepper, your child should also know to grab sturdy shoes along with his or her bugout bag.
- Situational awareness. Teach kids to look around and ask them what they see on outings. Is that a safe and friendly dog? Look at the tail. If it's wagging, you can get a good feeling that the dog is friendly. Is the dog stiff with ears up? Teeth flaring? Talk about situations with your kids, including the kinds of animals and people to trust and not trust.
You are your child's best teacher! To begin prepping with your
kids, tell them why you prep. Ensuring your child would have
enough to eat may have been the original inspiration for you
when you started your prepping quest, but as the economy or
other global crisis ensues, your prepping plans may have
changed. Whatever your personal motivation, it's important to
start by sharing. Show them you care because you prepare!
Happy endings...
Get started prepping with kids today. Whether you home school
your children or grandchildren, or whether you have a younger
sibling, cousin, niece or nephew who would benefit from
learning prepping skills from you, now is the time to start. If
you are a scout leader, then you can ensure the kids in your
troop have survival skills and can help them teach their
families survive. Prepping with kids is fun and rewarding.
Source: http://www.happypreppers.com/kids-prepping-skills.html
Subscribe to:
Posts (Atom)
Wild Camping Tips and Kit List
The first rule of Wild Camping club is... actually really simple! Leave No Trace: if you take it in, you carry it out. What is wild camp...

-
The first rule of Wild Camping club is... actually really simple! Leave No Trace: if you take it in, you carry it out. What is wild camp...
-
How to Start a Campfire: Ultimate Guide Me make fire. Fire good. Fire bring warmth and cook food. Our relationship with fire spans back...


