Thursday 30 August 2018

Can you eat crab apples? 3 favourite crab apple recipes

Can you eat crab apples? 3 favourite crab apple recipes

They may be small and sour, but you can make some amazing recipes with crab apples. They have an exceptionally high pectin and acid content which makes them ideal for setting fruit jams and jellies. They also have an excellent, tart and tangy apple flavour.
Here are three recipe ideas. Give them a go. You won’t be disappointed.

Crab apple jelly

Photograph of crab apple jelly
Easy and traditional crab apple jelly
This is a taste bud-tingling amber-pink jelly. It’s perfect for serving with meats. You can pep up the recipe by adding a few chillies, a cinnamon stick, coriander seeds or star anise to the pan.

Ingredients

  • As many crab apples as you want to use
  • Enough water to just cover them
  • White sugar - 450g for every 600ml of strained juice

Method

Tip crab apples into preserving pan (no need to cut them up). Add enough water to just cover them. Bring to the boil, simmer and stir now and then until the fruit has turned mushy.
Allow to cool a little and then pour into a jelly bag and leave to strain overnight into a large bowl. Don’t squeeze the bag or the jelly will be cloudy.
Measure the strained juice and pour back into the preserving pan and heat slowly. Add 450g sugar for every 600ml of juice and add to the juice. Stir until the sugar dissolves bring to the boil. Boil rapidly until setting point is achieved (test by dropping a spoonful of mixture onto a fridge cold saucer, as it cools it should wrinkle on the surface). Pour hot jelly into hot sterile jars and seal immediately.

Crab apple liqueur

Photograph of crab apple liqueur
Crab apple vodka - perfect for a cold winter night.
If you’re a fan of sloe gin and fruit liqueurs, make this. So intense is the appliness of crab apples, you’ll end up with a deliciously golden liqueur with a divine, rich taste. Perfect for a cold winter’s eve by the fire.

Ingredients

30 to 40 crab apples (washed and halved)
1 litre gin or vodka
200g caster sugar

Method

Fill a large preserving jar ¾ with crab apples. Pour sugar over and add gin or vodka. Add any remaining crab apples to the top and seal. Steep for one to two months. Turning the jar daily for the first week and now and then afterwards.
Strain liqueur through two or three layers of muslin and decant into a bottle. Leave for another month or so (or as long as you can bear).

Toffee crab apples

Photograph of toffee crab apples
You can add toppings to your toffee crab apples.
Toffee apples often only get half eaten because they’re too big. But crab apples are the perfect size. This recipe makes 12 toffee crab apples.

Ingredients

12 good condition crab apples, washed, and remove black flower remnants on bottom of apples
12 small kebab sticks
200g sugar
1 teaspoon cider or white vinegar
1 teaspoon butter
3 tablespoons water
Red food colouring (optional)

Method

Press kebab stick into the centre (core) of each apple.
To make toffee, place all ingredients except apples in a pan and bring to the boil. Stir until sugar has dissolved. Then boil rapidly for 2-3 minutes, until a small blob dropped into a cup of cold water forms a soft ball. Don’t take your eye off as it burns easily.
Remove from heat, tilt it to one side and then dip the apples in. Give them a slow spin to evenly coat in toffee, then place on a piece of greased baking paper on a tray. The toffee takes a minute or two to set.

Wednesday 29 August 2018

Rose Hips - What Are They and What Do You Do with Them?


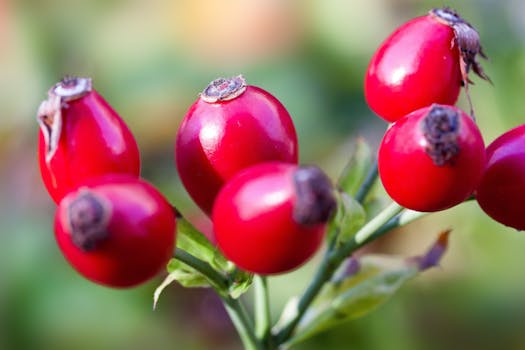
Red Round Fruit

Rose hips are the seed pods of roses. We don’t often see them anymore, because we tend to prune the faded rose blossoms to encourage more flowers. However, if you leave the spent flowers on the rose bush at the end of the season, you should see these small, berry-sized, reddish seed balls, left on tips of the stems. They are actually very ornamental, looking like small crabapples. They are also edible and birds enjoy them, too.

How to Eat Rose Hips

Both rose hips and rose petals are edible. Roses are in the same family as apples and crab apples, so the resemblance of their fruits is not purely coincidental. Rose hips also have a bit of the tartness of crab apples and are a great source of vitamin C.
All roses should produce hips, although rugosa roses are said to have the best tasting hips. These are also generally the largest and most abundant.
Don’t use rose hips from plants that have been treated with a pesticide that is not labeled for use on edibles. If you're not sure, it's best to avoid using them.

Harvesting Rose Hips

The best time to harvest your rose hips is after the first frost. Frost helps sweeten the flavor. They should still be firm and have good color. Leave the shriveled or dried rose hips for the birds to enjoy; they won't be as tasty and may be too mushy to pick.
Waiting until after a frost is also good for the plant, since cutting the hips before frost could encourage the rose to send out new growth which would only be killed back at the next frost.

How to Prepare Rose Hips

You can use whole, fresh rose hips, but the seeds inside have an irritating, hairy covering, so it is recommended you remove them prior to eating.
Trim off the stem and blossom ends. Hold the hip securely and slice it in half, then remove the inner seeds. You can do all of this trimming with a pair of scissors if the hips are too small to use a knife on.
Now rinse off the hips and prepare as you choose. Here are a few suggestions, below.

What Can I Use Rose Hips For?

Rose hips make great jellies, sauces, syrups, soups and seasoning, even fruit leather. To get a sense of the taste of rose hips, start out brewing yourself a cup of tea.
You can use fresh or dried rose hips, for a simple rose hips tea. You’ll need about twice as many rose hips if using fresh. For fresh rose hip tea, steep 4 to 8 rose hips in a cup of boiling water for about 10 to 15 minutes.

If you want to try out the flavor of rose hips, but don't have any in your garden or you aren't up to all the seeding and prep work, rose hip tea is widely available in stores. Don't use aluminum pans or utensils that could discolor the hips. Aluminum also destroys their vitamin C. Stainless steel is fine.

Monday 27 August 2018

How to build a great campfire for cooking


  • here are two ways to build a campfire for cooking. (Voyageur Press / Will Taylor)
Whether you're out for a day or on a weeklong camping trip, cooking over a campfire makes everything taste good.
By 
Linda Ly
 
 UPDATED 3 JUL 2017 - 2:14 PM

For many people, a good camping trip is all about a great campfire and the gathering of family, friends, and food that come with it. Many a story’s been told and a marshmallow toasted over a roaring fire — traditions that are as beloved in backyards as they are in the bush.
Preparing food over actual logs is a time-honored tradition in camp, whether you’re grilling or cooking in foil. It’s a deeply satisfying method that fills your entire campsite with the nostalgic perfume of “campfire smell” and infuses your food with a smoky, woodsy flavor.
Blueberry skillet scones
Start the day with these campfire blueberry skillet scones

To build a campfire that burns for hours and makes great coals, you need three types of fuel: tinder, kindling, and firewood.
Tinder is any dry material that ignites easily with only a spark, such as dried grasses, dried leaves, or forest duff.It can also include materials you bring from home, such as newspaper or dryer lint.
Kindling consists of small sticks or twigs, usually less than 1 inch in diameter, that keep the flames going after the tinder burns out.
Firewood is any larger piece of wood that feeds the fire all night long.
There are several ways to build a fire, and even variations within them. Both methods that follow have their merits, so choose the one that is simplest for you to construct.

Teepee method

Loosely pile a few handfuls of tinder in the center of the fire pit.Erect a teepee of kindling around the tinder, leaning the sticks against each other for support while allowing enough space between them for air to flow. Light the tinder inside the teepee. As the kindling catches fire, add larger pieces of wood on top.Start with smaller logs and gradually add thicker logs once you have good, strong flames. 

Log cabin method

In the center of the fire pit, place two logs parallel to each other with several inches of space between them.Lay a row of kindling perpendicular to the logs to form a base, and pile plenty of tinder on top.Turn 90 degrees, and lay two logs over the ends of the kindling.Turn 90 degrees again, and lay another row of kindling perpendicular to the logs.Continue adding more logs, changing direction with each layer, until the structure resembles a log cabin.Finish with two logs stacked in the middle for the flames to catch. Light the tinder and gradually add more wood as the fire gets going.

Preparing to cook

Once the flames are log and the logs look like ashy chunks atop a glowing bed of embers (at leat 45 minutes to 1 hour), you’re ready to start cooking on a grill or directly on the coals. Keep a log or two burning in the back of the fire pit in case you need more fuel for the fire.
Dutch oven lasagne
Cooking with coals: use a Dutch oven to make this lasagne for a hearty campsite dinner. 

Putting out fires

Stop adding logs about an hour before you plan to sleep or leave your camp. Once the fire burns out, spread the coals and pour plenty of water on them. Stir the ashes, then pour more water over them until the coals have cooled completely. When you hover your hand above the coals, you should feel no hotspots.

Tool tips

At minimum you need a long stick to move coals and logs around the fire pit, but having these tools handy can make quick work of certain tasks:
• A hatchet to make kindling from purchased firewood if you aren’t able to collect kindling around the campsite.
• A small shovel to clean out fire pits and move around coals.
• A bucket (or dishwashing tub, see page 000) to fill with water and extinguish the fire.

Fire ethics

Always check with the campground host or national park information office to ensure fires are allowed, especially during periods fo drought and high fire hazard. Restrictions are sometimes seasonal so a site that allowed fires on your last trip  may not allow them on this trip.
In campgrounds, build fires only in designated fire pits to keep your fire contained and lessen your impact on the environment. In undeveloped campsites, strive to build fires in existing fire pits if previous campers have left them behind. If you must build a new fire pit, keep it at least 3-6 metres (10 to 20 feet) from any tents, trees or other flammable objects. Clear a cirle about a metre in diameter, down to the dirt, and enclose it with a ring of large rocks. Be sure to fully dismantle the fire pit before you leave.
Never leave your campfire unattended and make sure the flames are fully extinguished and the coals are cold when you depart your campsite.  

Wild Camping Tips and Kit List

The first rule of Wild Camping club is...  actually really simple! Leave No Trace: if you take it in, you carry it out. What is wild camp...