
Showing posts with label survival. Show all posts
Showing posts with label survival. Show all posts
Thursday, 18 October 2018
Saturday, 4 August 2018
10 ITEMS YOU NEED TO SURVIVE IN THE WILDERNESS

If you can’t take a seasoned survivalist with you to the wilderness, take the next best thing -- his stuff. We spoke to last-man-standing Alan Kay, winner of the HISTORY'S original reality series Alone, which sends 10 expert survivalists into the forests of Canada armed only with 10 tools of their choosing. To help you make it the wild, Alan talks about the 10 items he picked and why you should pick the same… that is if you want to actually survive for 56+ days like he did.
1. A large 2qt cooking pot
Surprise -- you need water to survive and a pot in which to purify and boil it. According to Alan, a pot is one of the top three things a survivalist should bring, if not the most important. While boiled lake water probably won’t taste great, it definitely beats a crippling case of giardia.
Alan Says: “To improvise a metal pot would be almost impossible. There are ways you can do it, but it would involve so much more energy and it wouldn't be efficient."
2. A handy saw
Used for more than potentially freeing a limb while stuck between a rock and a hard place, the saw is pretty great for shorter excursions into the wilderness, due to its lightweight nature, precision, and unlikelihood of causing accidental bodily harm.
Alan Says: “If you’re fatigued, you can use it instead of swinging around a sharp object. It’s less likely to cause any injury.” During his sojourn into the forests of Canada, Alan used the saw mostly to build his shelter and cut logs down to a size where he could split them into smaller pieces for firewood -- something you might be doing almost daily if you’re roughing it.
3. An insulated sleeping bag
While you could technically make it without a sleeping bag, why would you want to? Not only does it provide insulation, you’re protecting yourself from the wet, cold ground. Bring a mat to put under that sleeping bag and you're practically living in woodland luxury.
4. A chop-it-all axe
All ten contestants took the ax with them to the perpetually rainy woodlands of Vancouver Island, but it’s a pretty solid choice whether you’re sweating it out in the rainforest or eating frog legs in boggy swamplands. The ax is a survivalist essential for every terrain, and unlike the saw, can be sharpened and looks badass when paired with giant blue draught animals.
Alan Says: “It’s quick and easy, albeit heavy. An axe would enable you to process bigger wood than you would would with a saw or a knife.”

5. A spark-producing ferro rod
A ferro rod is also one of the top three items a survivalist should carry at all times. It’s a hunk of metal -- the man-made ferrocerium -- that produces a shower of sparks when scraped against a hard surface, usually a knife. While it does take a little bit of practice to use, a ferro rod is better than the alternative: depending on energy-consuming neolithic methods, like rubbing sticks together or cave magic.
Alan Says: “I can make a fire through other methods, but because it’s such a wet environment up there -- they measure their rain in feet instead of inches -- I just felt like having a really solid way to get a spark would be a wise decision, especially because I would need fire on an almost daily basis."
6. A multi-purpose metal water bottle or canteen
A canteen can be used for a host of different things -- not just staying hydrated. You can use it to cook in a pinch, especially if the canteen is stainless steel or aluminum. You can boil water in it to carry your supply from one place to another, gather food, or even dig with it if you've totally lost your mind.
7. A small gauge gill net for creating an emergency food supply
A gill net is like a large volleyball net that can be set up and left unattended as you go about your day-to-day survival tasks. Dumb-as-hell fish swim right into the thing, catching themselves. Not only is it less effort than real fishing, important when you’re trying not to burn any precious calories, but it can also be used as a snare to catch wild game.
Alan Says: “I found that more more passive methods, such as the gill net and fish traps made out of bottles and things, yielded food on a daily basis pretty much.”

8. A versatile knife
Joining the pot and the ferro rod in the group of top three most important things to have in a survival situation is a knife -- and not just any sharp blade will do. Alan chose the kukri knife for its ability to perform out of proportion to its size. It’s thick and heavy enough to split wood like a hatchet or a machete, but if you keep it sharp, a kukri knife is also able to do some very fine work, like cleaning fish or carving spoons, just in case you're expecting company and really want some spoons.
Alan Says: “I always think in terms of what if i was injured? With a knife like that, I’d still be able to use one hand if my other hand was in a sling."
9. A 3.5lb wire for “hey, I might need this…”
Alan was the only person who ended up taking the wire. It’s the type of thing that you might overlook until you really need it. It could help with anything from building snares to trap game or in shelter-building.
Alan Says: “My thought process in taking it was that wire would be very hard to improvise in nature. And it would be so durable and there are so many different things that I can do with it.”
10. A 300yd single filament line with 25 assorted hooks for fishing
Alan didn’t need to use this item as much, because the gill net didn’t require as much of his time and energy. However, and this is a big however, it’s a good backup, especially if you know your location has a fishy bounty. More importantly, a gill net that catches fish en masse is illegal in most places, and is only to be used in emergency survival situations.
Wednesday, 11 July 2018
10 Most Useful Plants and Trees For Survival Found in the Wild
10 Most Useful Plants and Trees For Survival Found in the Wild
 Survival skills are something we all need to have, but don’t think are important until that moment arises when we are lost in the wilderness.
Hopefully an emergency situation like this won’t arise for you, but in the event it does, here are the most useful plants and trees that grow in the wild that will help you survive.
They are broken down into two categories, with the benefits of each type listed below.
Survival Trees That Grow in the Wild:
Dogwood trees. These type of trees, often found as members of a deciduous forest, thrive in humid, moist conditions. While they’ve been admired for their beauty (and are still celebrated and recognized as picturesque trees today), dogwoods are also immensely useful.
Native Americans have used a variety of different parts of the dogwood for medicinal purposes, and in a modern-day survival situation, we can do the same.
You can boil the bark and leaves of the tree to create a drink that helps with fevers and reduces chills. A dogwood’s branches make a good substitute toothbrush, as well. Chewing the branches causes the end of the stick to fray, and the soft wood acts as bristles so you can brush your teeth.
Walnut trees. Walnut trees are another type of deciduous tree with a variety of uses. They provide a great and healthy snack via the nuts they produce, but they’re much more than a source of food. The wood from these trees is sturdy and easy to work with, and the shells of the walnuts themselves can be used as a dye.
Of course, having fancy dye won’t help you survive in the woods. So instead, use the dried husks to make a medicinal drink. Apparently, it tastes terrible — but is an effective remedy for parasites. Fresh husks can work as an antiseptic on cuts and scrapes, too.
The walnut tree does fall short in one big way, however, the wood from the tree makes terrible firewood and doesn’t burn well.
Cedar trees. These trees are evergreens with an instantly-recognizable, strong smell. It’s that odor that makes cedar chips effective at repelling pests like ants and moths.
Like many other trees, the needles from cedars can make a tea. The brewed needles can help treat fungal infections that are easy to pick up in survival situations.
Where walnut trees fail at providing good firewood, cedar excels. The splintery bark of the cedar tree provides a great tinder for getting a good fire going. You can pull bark off the tree in strips, which also makes it useful for makeshift cords or even rope.
Willow trees. Willow trees have long been appreciated for their therapeutic properties. You can use the bark of the willow to relieve numerous illnesses and pains.
After boiling dried bark in water for fifteen minutes, the drink it creates can be used to help people suffering from headaches, fevers, and inflammation. The active compounds in willow bark act similarly to modern-day aspirin.
Editor’s Note: 37 Critical Items You Need in case of an Emergency
The Most Useful Plants in the Wild:
Yarrow. This herb is most often found in open spaces like meadows. It grows white flowers in clusters and stands tall at one foot or higher. The flowers are edible and can be used for homeopathic purposes, too. Brewing them and then drinking them as a tea can help relieve colds and flus and can even soothe an upset stomach.
Yarrow is a multi-purpose plant, which makes it even more valuable for survival. Applying the leaves of the herb to open or bleeding wounds not only stimulates clotting but also serves as an antiseptic.
Rose hips. When you think “survival,” your mind probably didn’t jump to “roses.” But rose plants found in the wild do bear fruit that people can use.
The fruits, called rose hips, brew down to make teas people drink even when they’re not in a survival situation. They’re highly nutritious, containing plenty of vitamins, and can be drank in tea form or eaten when ripe.
Before you consume a rose hip in any way, remove the blossoms and the stems. You might want to dig out the seeds as well, as they can cause stomach irritation to some.
Nettles. Although nettles are weeds (often called “stinging nettles” because they hurt if you brush by them with bare skin), you can put them to work for you in the wild.
They’re covered in fine hairs, which is what causes that stinging sensation. Boiling the stalk, leaves, and even the root of the weed will not only take away the sting, but also create a tea that can help treat digestive issues and upset stomachs.
If you suffered a cut or have an infected wound, nettle leaves can clean it. And you can weave the inner stems of the nettle stalk, once dried, into cords or ropes.
Cattails. Out of all the wild plants you can find to use, cattails may be the most prized among survivalists. You can easily identify mature cattails and should seek these out; younger plants are easier to confuse with plants that are toxic to consume.
You can eat both the stems and the roots of cattails. They’re even safe to eat raw (but might be easier to get down if they’re boiled first). Cattail pollen can be used like flour, and their flowers are edible too if you roast them.
If you need shelter, the long leaves of the plant can be woven together for protection from the elements or you can use them as floor mats.
Cattail roots, once cut open and mashed, can be applied to wounds, burns, and bug bites. The stems also produce a substance that looks like honey and has antiseptic properties.
Dandelion. Craving a salad? All parts of the dandelion are edible, and it’s another one of the wild plants that is actually used in non-survival settings from time to time.
You can eat dandelion leaves raw or you can cook them like you would spinach or kale. The roots should be boiled, and once ground up, they make a good coffee substitute. Additionally, you can also crush the stems of the weed and use the liquid inside as a glue.
Pineapple Weed. Pineapple weeds are named appropriately: the yellow bulbs at the end of their stems look like miniature pineapples.
You can eat both the leaves and the flowers of the plant raw. If you dry out the flowers, you can then grind them up and use the powder like a flour for baking. The leaves can also be brewed in a tea or infused (by soaking in water without boiling) to relieve digestive discomfort.
Tuesday, 3 July 2018
How to Build a Wilderness Survival Shelter with No Supplies
Shelter is your #1 survival priority, so knowing how to make a survival shelter is something that everyone should know. Ideally, you would keep a tent or a tarp in your Bug Out Bag in case you ever needed to flee into the wilderness and make your own shelter.
Making a tarp shelter is actually pretty easy once you’ve practiced it a few times (knot-tying skillscome in handy here!). Here are some survival shelter designs you can make in under 20 minutes with a tarp.
But what if you don’t have a tarp or any other supplies with you?
I’ve read wilderness survival stories where people lost in the woods buried themselves in dirt or covered themselves in leaves to stay warm during the night. That’s a great tactic – until it starts to rain or snow!
Here is how you can make a wilderness survival shelter without any supplies (aka brush shelter) in the wild.
Don’t forget to practice it so you’ll be prepared should you ever need this survival skill!
Step 1: Choose Your Site
Choose a spot for your wilderness shelter which is:
- Dry
- Flat
- Not right next to a body of water.
- Not underneath any cliffs, falling rocks, or dead limbs which could fall on you
- Is readily visible or very well hidden (depending on whether you want to be found or not)
- Have a good place for a fire right in front of the doorway
A note about choosing a flat site for your shelter. This is not just for comfort!
If your shelter is on a slope and it starts raining, then the rainwater can come into your shelter.
If you are unable to find a flat spot for building your shelter and rain is likely, then you will need to dig trenches to divert the water away from the shelter.
Step 2: Assess Your Needs
A lot of wilderness survival experts will tell you that this or that method is the best survival shelter. However, it really depends on your needs.
Here are some of the things you need to consider:
- How many people are in your group?
- Does your shelter need to be camouflaged?
- How cold is it? Will you need to build a fire inside or directly in front of your shelter?
- How much time do you have to build the shelter?
- Is the shelter for long-term or short-term use?
Step 3: Decide On a Type of Shelter
This is actually the most important part of building a shelter in the wilderness. If you know a few shelter designs AND know what they are best suited for, then you will be able to make the right shelter.
Here I’m going to go over how to build the most common types of wilderness survival shelters and WHEN TO CHOOSE THEM.
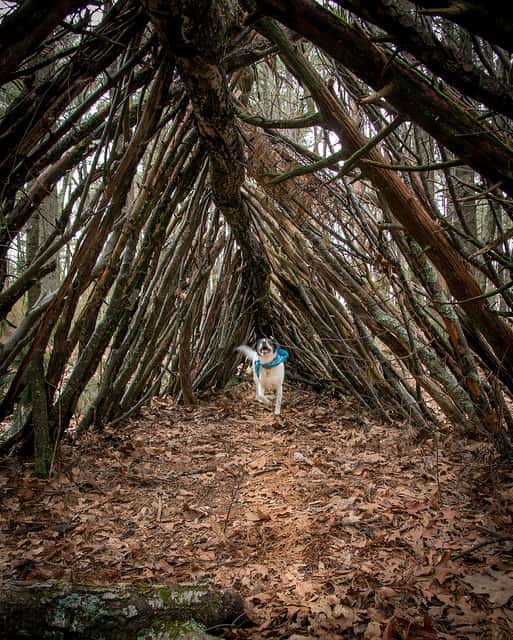
Option 1: The A-Frame Brush Shelter
This is a great short-term survival shelter for a single person because it is so fast and easy to build. It is also easy to find materials for building it.
Properties:
- One person
- Fast to build
- Very easy to build
- Camouflaged
- Temporary/short-term
- Fire won’t warm inside the shelter
How to Build the Shelter:
- Find one long, sturdy branch. It should be a few feet longer than your height.
- Prop one end of branch up on a tree stump or log. Alternatively, you can prop it up on two shorter branches, making an A shape.
- Lean shorter branches against the branch. Now you have a frame.
- Now cover the frame with leaves, branches, or other brush.
*You can also make this survival shelter against fallen trees. Or, for a larger A frame shelter, prop up both ends of your long branch. With this method though, wind can blow in from the sides and it also won’t trap your body heat as well.

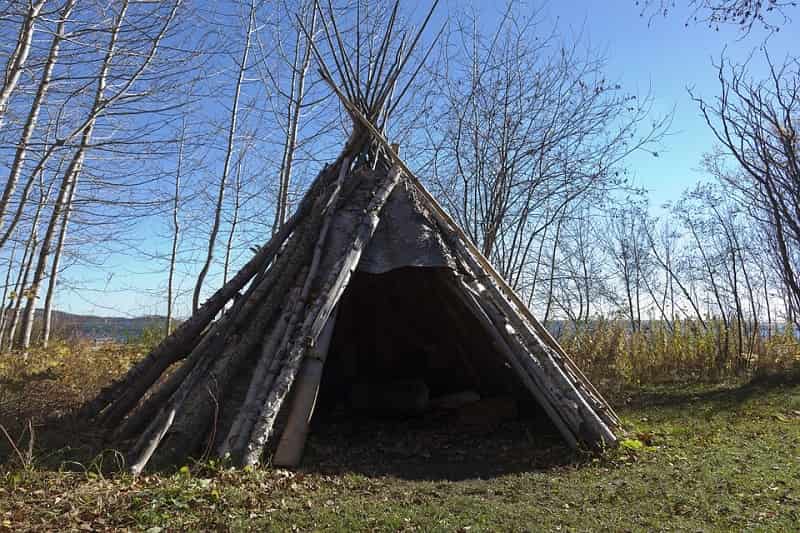
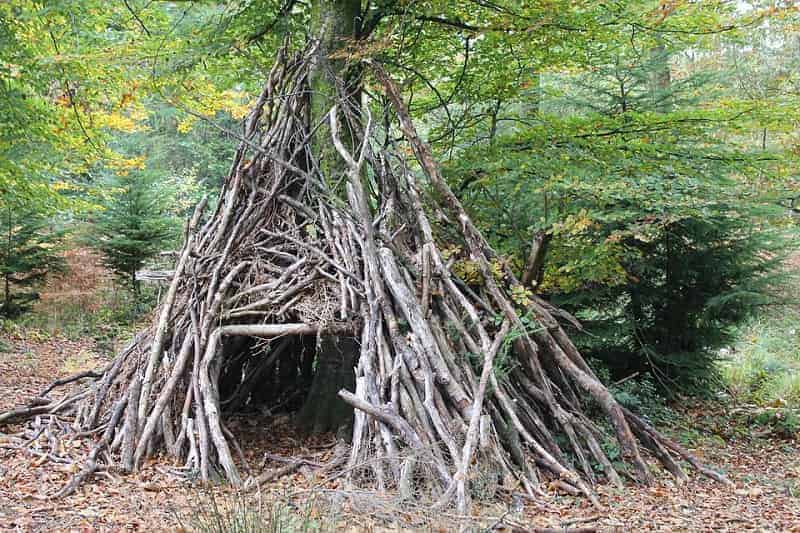
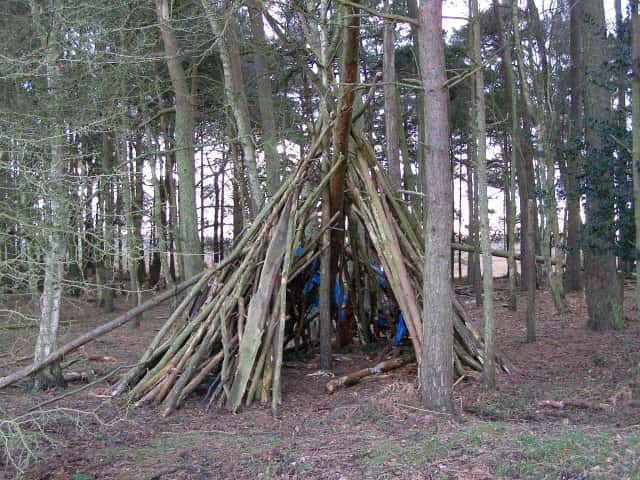
Option 2: The Tipi Shelter (Teepee)
You are probably familiar with this shelter design and maybe you even made a few (I know I made them as a kid). These are relatively easy to build but you’ll need to have a lot of long branches around.
Another downside of the tipi shelter is that its high, vertical shape makes it relatively unstable during high winds. Because it is large in size, it won’t trap your body heat as well as a smaller brush shelter would.
Properties:
- Easy to build
- Good for larger groups of people
- Requires lots of long branches
- Not suitable for high winds
- Doesn’t trap body heat as well as some shelter designs
- Fire won’t warm inside the shelter
- Will need to use leafy branches for covering as leafs and brush tend to blow away
How to Build the Shelter:
- Find three long branches that are relatively the same length. Prop these up to make a tripod frame. This can be relatively difficult to do without rope. Alternatively, you can prop the branches against a tree to make a modified tipi shelter.
- Add more long branches to the tripod you built. The more branches you build, the sturdier the frame will be. Remember to leave a gap for the doorway to the shelter.
- Keep adding branches, including shorter ones. There should be as few cracks as possible in the frame.
- Cover the frame with leafy branches. Brush doesn’t work very well for covering because it easily blows away. Birch bark also works great for a covering – just don’t peel all the bark away unless you are in a true survival situation as it will kill the tree!
- If you do use brush for covering the tipi shelter, you’ll need to add more branches to the outside to prevent them from blowing away.
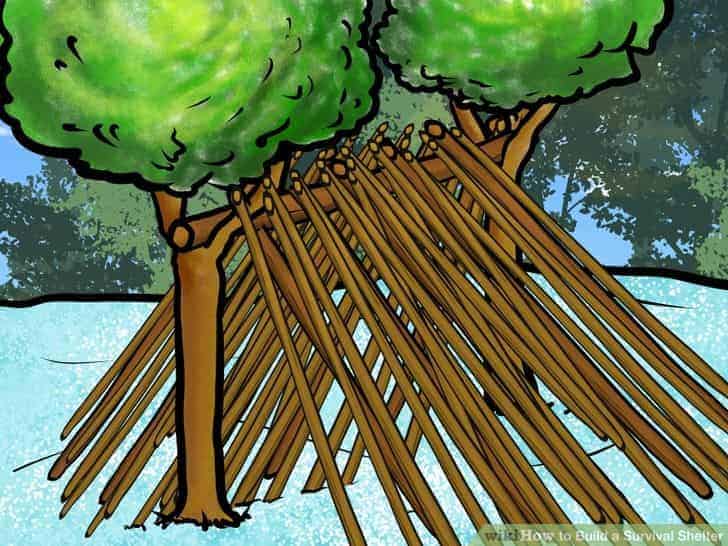
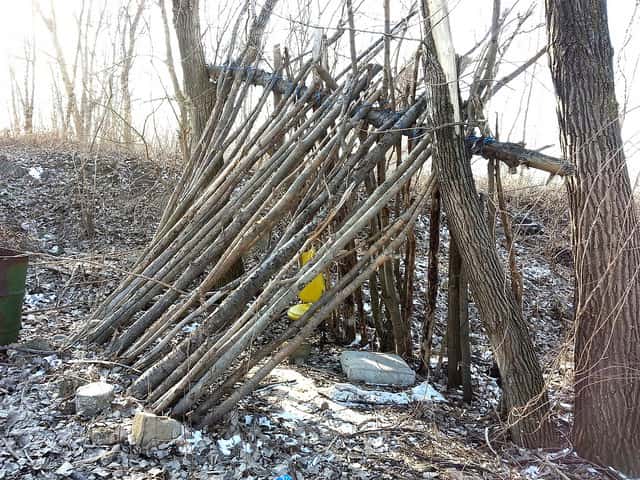
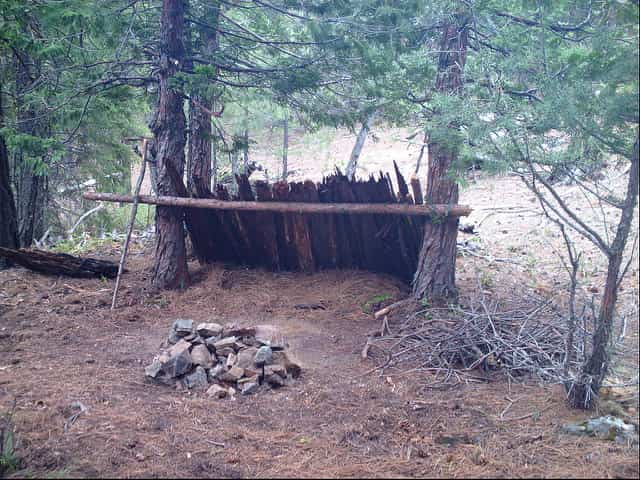
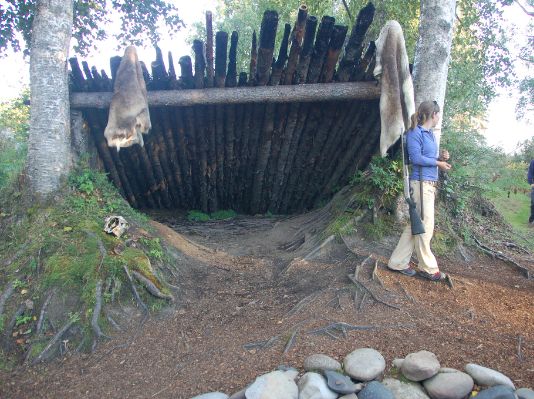
Option 3: Lean-To Shelter
The lean-to shelter is easy to make and roomy. It doesn’t trap body heat as well as a completely enclosed shelter. However, the wall of the shelter also acts as a fire reflector. If you make a fire in front of the shelter, the heat will bounce off the wall and keep you warm. To make it even better for cold weather, make a fire reflector/wind screen on the other side of your fire pit.
Properties:
- Not very warm by itself; will need to make a fire and preferably also a wind screen/fire reflector
- Wind can get in from the sides
- Not very camouflaged
- Easy and fast to make
- With addition of a “bed” and wind screen, it can be suitable as a long-term shelter
How to Build the Shelter:
- Find two trees at least 6-8 feet apart (depending on how tall you are)
- Find a long, sturdy branch slightly longer than this.
- Using cordage (read how to make cordage from plants here) or flexible tree branches, tie the branch between the two trees.
- Alternatively, you can prop the branch on two tree stumps, between two forked branches that you’ve stuck in the ground, or even on mounds of dirt.
- Take note of which direction the wind is blowing. Now lay branches across your main branch so they will block the wind. You now have a lean-to frame.
- Cover the lean-to frame with sticks, brush, and debris for insulation and protection from the rain.
- If it is windy or rainy, block the sides of the lean-to shelter for additional protection.
Option 4: Shelter with a Smoke Hole
There are a bunch of ways to make shelters with smoke holes. You could make a tipi style shelter and leave a hole in the top. Or you could dig an earthen pit house shelter with a hole for a fire inside.
Unless it is truly freezing cold, never make a fire inside your survival shelter! The risk of burning your shelter — and yourself — is too great. If you do need to make a fire, then it will need to be VERY SMALL and controlled.
Properties:
- Many possible designs
- Takes a lot longer to build because the smoke hole decreases stability
- Higher learning curve
- Good for winter survival situations
Since there are so many ways do make smoke hole shelters, I won't give you instructions here. I'll save that for a later, more detailed post.

Note that there are plenty of other ways to make a wilderness survival shelter without supplies.
Go out and try some!
That is the only way you will be able to get a feel for which survival shelter is right for your unique situation. Have fun!
Source: https://www.primalsurvivor.net/wilderness-survival-shelter-no-supplies/
Subscribe to:
Comments (Atom)
Wild Camping Tips and Kit List
The first rule of Wild Camping club is... actually really simple! Leave No Trace: if you take it in, you carry it out. What is wild camp...

-
The first rule of Wild Camping club is... actually really simple! Leave No Trace: if you take it in, you carry it out. What is wild camp...
-
How to Start a Campfire: Ultimate Guide Me make fire. Fire good. Fire bring warmth and cook food. Our relationship with fire spans back...


