Follow these instructions and you’ll be warm and eating a bowl of hot soup in no time.
1. Prepare some tinder. There are many things you can use such as cedar shavings, birch bark shavings, cattains, cotton bails, etc. The drier the better.
2. Find a piece of soft wood. You might get it off a piece of furniture or from an abandoned building. As long as you can make a mark on it with your fingernail, it is soft enough. Make sure it’s no more than two feet long, no more than six inches wide, and no more than an inch thick.
3. Find a very hard stick, about a foot long and a half an inch thick. With this one you shouldn’t be able to leave a mark on it with your fingernail, otherwise it is too soft.
4. Kneel down over the soft wood. Rest one end of the hard stick on your thigh and the other end on the wood. It should slant either right or left (depending on whether you are right or left-handed) at about a 45-degree angle.
5. Get a good grip on the stick and start rubbing it up and down the soft wood, making sure the keep the path straight as it forms a groove. The “ploughing” should be hard and fast. This is where your stamina comes into play. Ignore your burning muscles and keep at it!
6. Soon a pile of wood shavings will form at the end of the wood. Eventually the wood will be hot enough to ignite the wood shavings into embers.
7. Immediately place your kindling on the embers and gently blow on it until the kindling ignites.
This past weekend The Bug Out Bag Guide Family hosted a barbecue for some close friends. One of the highlights of this was testing out an alternative fire building method in our back patio firepit. Instead of building a standard teepee or log cabin we decided to try building what is called an “upside down fire”. We got some great, hassle-free results from this that we wanted to share with you. As I always say, it is always good to add new techniques to your survival skills. At the end of this article you will know how to build an upside down fire on your own!
Over many years of camping I have built hundreds of fires. These were mostly of the teepee and log cabin variety, with some lean-to fires mixed in as the situation required. These fire building methods have served me well and I have enjoyed many a meal and evening sitting around their warm glow.
I was excited to learn about a new method of fire building and try it out for myself. What I learned from my test run, is that there are several advantages that an upside down fire brings to the table.
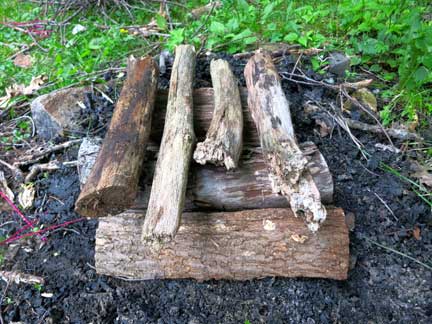
Here is one I built at home
An upside down fire is self feeding
An upside down fire is built in a layered fashion starting with tinder at the top and increasing in size all the way to large logs at its base. One of the biggest advantages of using this fire building method is that as a layer burns it progressively ignites the larger layer below it. The tinder lights the kindling, which ignites the fuel wood, which in turn lights the logs. In other words, once an upside down fire is lit it will burn by itself for hours. There is no need to baby sit it and keep adding wood over time! You can light your upside down fire and then focus on other tasks like setting up camp, preparing food, or just relaxing with your fellow campers.
While traditional fires (teepee and log cabin) do progressively ignite successive layers (if properly built!) they tend to do this over a shorter period of time and require that a fire tender monitors the burn rate and add more fuel and eventually place logs onto the fire. The genius of an upside down fire is that it frees you from this chore!
Being self feeding makes an upside down fire an excellent choice if you want to keep a heat source burning through a long, cold night. As it is self feeding you will be able to build it before bed, light it, and then keep warm without having to climb out of your sleeping bag or shelter.
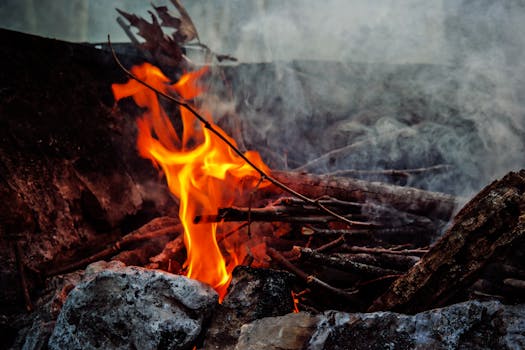
Here is that same fire after 10 minutes
An upsidedown fire generates lots of coals
As an upside down fire burns it creates a large supply of coals from the logs integrated into the base of the design. These logs are lit as the flame consumes the fuel wood and transfers heat down to this base layer. These coals are excellent for most cooking purposes. With a good bed of coal you can:
cook foil packets
heat up a dutch oven
barbecue meat, fish, or vegetables
and much, much more…
With a traditional fire you would need to set up your teepee or log cabin and as they got burning need to continually feed it larger and larger logs to get a nice bed of coals going. The upside down fire does this automatically with the same amount of wood but far less active management. Set it up, go get your food ready and then come back to a nice bed of cooking coals!
…And again after 40 minutes
Where can I use an upside down fire?
An upside down fire can be used pretty much anywhere you would build a traditional fire. It can be a great option for many applications:
Yes! People often build them in fireplaces or woodstoves for the same reasons why they are used outdoors. Wood stove enthusiasts actually favor the upside down fire building method as it tends to heat up the chimney pipe faster than a traditional fire and by doing so increases the stove’s efficiency.
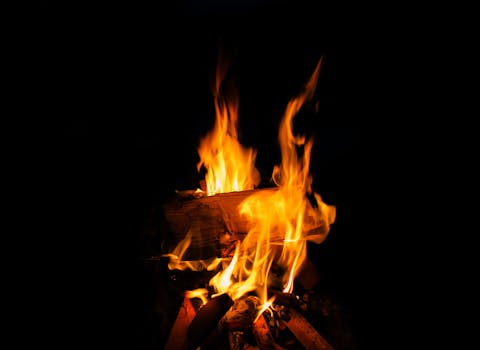
…And finally, the same fire after an hour burning without my intervention!
How to make an upside down fire
Here is a step by step guide for building your own upside down fire. Follow the written instructions and refer to the pictures if you run into any trouble.
Step 1: Clear your fire pit
You are going to lay your base layer of logs down in the next step so you will want your pit clear of debris and as level as possible so the fire you build will not topple over as you build it up.
Clear your fire pit out
Step 2: Lay down the base logs
You are going to build your base layer first. This means use the largest logs you intend to burn and lay them down parallel to each other. Have the logs all touching each other so there are no gaps between them and it is best if the tops of them are relatively level with each other so you will have a nice sturdy base to build the rest of your fire upon.
Lay down your base logs
Step 3: Thicker Fuel Layer
You are going to use large fuel wood for this layer, larger than your thumb. Remember, this layer has to be large enough to generate enough coals and heat to ignite the logs below it. Lay this wood in the opposite direction to the logs below it and allow space between each piece for air to flow. Feel free to build 1-3 layers of this sized wood if you have enough and if you have organized your wood build each layer upwards out of slightly smaller thickness pieces. Each layer should be laid down crosswise (perpendicular) on top of the layer below, similar to the method used when building a log cabin.
Add on your fuel wood
Step 4: Smaller Fuel Layer
You are going to repeat the process used in step 3 here but using smaller fuel wood, preferably smaller than your thumb in thickness. Once again build 1-3 layers of small fuel wood up with each being perpendicular to the last layer and slightly smaller thickness. You should have a small tower of wood now with the thickness of pieces used getting gradually smaller as you get nearer to the top.
And now your smaller fuel wood
Step 5: Kindling
Now you are going to start adding on the smaller wood that you have, kindling that is thinner than your pinky. Add 3-5 layers of this if you have enough to do so. By the time you get to the top layer the wood should be of the smallest thickness you have, no bigger than a twig. Stick to the same method of laying each layer down crosswise across the layer below it to allow proper air flow.
Get your kindling on there nextAnd the small twigs on top
Step 6: Tinder
Choosing and adding your tinder is a crucial last step. You need something that is small enough to be ignited with your match, lighter, or firestarter but that will burn long and hot enough to get your kindling to start burning. Place this tinder on top of your kindling. Here are some suggestions for kindling that have worked well for me in the past:
Shelter your match and tinder from any wind (If you are lighting your fire with an EverStryke Match, you don’t need to worry about this) and get that fire started. Depending on what tinder you chose you may need to blow gently to get the tinder going. As the fire burns each layer that you built should ignite the next one down all the way to your base layer of logs. In my testing an upside down fire built as I have described should burn for well over an hour and result in a large layer of coals all ready to cook your meal. Enjoy!
Your upside down fire is ready to light and enjoy!
Your Turn!
So, now you know how you build your own upside down fire. I encourage you to give it a try next time you are camping or setting up a backyard bonfire. It is a great tool to add to any fire building arsenal and I think you will be impressed with the results.
Campgrounds: Build fires only in designated fire rings, grills or fireplaces. Most developed campgrounds have some version of these. Using a fire ring will lesson your impact and keep your fire contained.
Always check with the campground operator to make sure fires are permitted. In some areas, severe dry periods can cause campfires to be prohibited even in campgrounds.
If you’re car camping in an undeveloped site, check in advance with the agency that administers the land (U.S. Forest Service, Bureau of Land Management, etc.). A campfire permit may be required.
Evaluate the site before starting a fire. If the site is brushy or has low-hanging branches, keep your fire small or skip it altogether. In dry conditions, fly-away embers could easily ignite a wildfire.
Backcountry: In backcountry areas where fires are permitted, use an existing fire ring if one has been left behind. Build a new one only in emergency situations and, if the situation permits, dismantle it when you are done. If one already exists, clean it out before you depart.
Clear away all flammable material from your fire pit. Ideally, the base of your fire should be sand or gravel or mineral soil (often found in streambeds or on gravel bars). Intense heat can sterlize healthy soil, so choose your site conscientiously.
An alternative to a fire ring is a mound fire. Using your sanitation trowel, build a circular, flat platform of mineral soil (sandy, light-colored, nonfertile dirt) about 6-8 inches high. Use this as the base for your fire. Ideally, build this platform on a flat rock. You can easily disperse the mound when you're finished.
Gathering Fire Wood
To burn a successful fire, you’ll need three types fuel: tinder, kindling and firewood.
Tinder includes small twigs, dry leaves, needles or forest duff.
Kindling consists of small sticks, typically less than one inch around.
Firewood is any larger piece of wood and is what will keep your fire going long into the night.
Campgrounds: Use only local firewood. Nearby stores often carry firewood, and sometimes campground hosts offer bundles of firewood or kindling for sale.
Do not bring wood with you if you’re traveling from more than 50 miles away. Campgrounds may even ban bring-your-own firewood regardless of the distance you travel. Why? To avoid introducing troublesome insects into a forest.
Call the campground or a local ranger office in advance for information and advice.
Backcountry: If you forage for firewood, gather only downed wood far from your site. Never cut live trees or break off branches from standing trees, even dead trees. Birds and wildlife make use of dead branches and snags.
Do not gather or burn pieces thicker than an adult's wrist. This is because thick chunks of wood are rarely allowed to burn completely and are typically left behind as blackened, unsightly scraps.
Remember to follow Leave No Trace principles when gathering wood.
Building a Campfire
Kindling and firewood can be assembled in a number of different ways. Popular styles include the teepee, log cabin and upside-down (or pyramid).
Teepee: Start with a small cone of kindling around a few handfuls of tinder that are loosely piled in the center of the fire ring. Once the fire is going strong and the temperature increases, you can add larger logs a few at a time as needed.
Log cabin: Place two larger pieces of firewood parrallel to each other and with some room in between to form the base of your structure. Then, turn 90 degrees and place two slightly smaller pieces on top and perpendicular to form a square. Place plenty of tinder inside the square. Continue adding a few more layers of firewood around the perimeter, getting a little bit smaller with each layer. Finish with a layer of kindling and tinder across the top. Remember to leave space between logs so the fire can get plenty of oxygen.
Upside down (pyramid): Start with three or four of your largest logs side-by-side on the bottom layer. Turn 90 degrees and then add a second layer of slightly smaller logs on top. Continue alternating a few more layers in this manner, getting smaller as you go. Place your kindling and tinder on top.
Lighting a Campfire
Light the tinder with a match or lighter. Using fire starter that is designed to easily ignite can help the tinder catch the flame. (Be sure to carry waterproof matches and firestarter. Fire-making materials are considered one of the Ten Essentials.)
After lighting the tinder, blow lightly at the base of the fire to provide oxygen, which will help increase the intensity of the flame and further ignite the wood.
As the fire burns, move embers to the center to burn them completely. Ideally, you should reduce them to white ash.
Extinguish all fires by pouring water on them, stirring the ashes, then applying more water. Repeat as often as needed. Ashes should be cool to the touch before you leave the site. Be utterly certain a fire and its embers are out and cold before you depart.
Never leave a campfire unattended!
Cleaning up Your Campfire
Burn trash items only if they can be fully consumed by fire and turned to ash. Do not attempt to burn plastic, cans or foil. If you do burn something that's not fully consumed, collect the remains when the fire is out and either pack it out or put it in a trash receptacle.
When you’re in the backcountry, pack out any trash found in your pit. Extract any charcoal pieces left inside your ring, carry them away from your site, crush the chunks, then scatter the remnants and dust throughout a broad area. Dismantle any structure you might have built.
Fire is essential for survival, cooking and warmth. Usually a fire is started with thin or split wood kindling but there are many other kinds of tinder and kindling that can be used if you're in a scrape and cannot locate any small wood.
Find tinder. Kindling tends to be the material used to let larger wood really catch, while tinder is small shavings or shreds of material that will burn hot quickly and starts the kindling burning. Kindling is larger than tinder. Examples of tinder include dry grass, dry bark and down from birds. Once the tinder is burning, you can slowly add the kindling, unless you've already arranged it in a style such as a lean-to or tip over the tinder (see below for links to building the fire). However, there is a fine line between what can be used as tinder and what can be used as kindling––sometimes certain material can be used for both purposes. Some ideas for tinder (some of which might also be useful as kindling) include:
Use lint. Pack a toilet paper roll with dryer lint. When you're ready for a fire, pile wood around the lint roll. Light the center of the cardboard roll (exterior) and it'll catch fire and burn outwards, catching on the piled wood as it burns. The beauty of this is that it's making use of items around the house and it doesn't weigh much in your pack. Also note that if you have several of these, they can serve as kindling as well as tinder.
Use pine needles. Use pine needles or pinecones to start a fire. Select only dry needles, not green ones, as these won't take as easily. Pile onto the fire in little lots rather than everywhere or it risks smothering the flame.
Save and dry small pieces of tree bark. Bark catches fire quickly and will maintain embers for a long time.
Use dry debris. Use dry debris from your yard, such as twigs, leaves, and moss to start a fire. Ensure that there isn't too much soil in what you've gathered, as it can prevent fire from lighting.
Find a substitute for kindling. Normally you'd look for dry wood, such as tree limbs, tree twigs and branches, or split wood if at an organized campsite. However, this isn't always possible, so the following ideas are presented to help you in a pinch.
Use your favorite potato chips as a fire starter. If you have a bag of potato chips handy, they can function as a fire-starter due to the fat content of the chips. Light a chip with a lighter or a match and it will burn for approximately 3 minutes. Add the lit chip to a pile of chips on the campfire you've set up (see below for making a fire). While the chip kindling is burning, place light, dry wood on top to catch alight over the burning chips.
Use newspaper. Roll five dry newspapers into a tight tube, tie the tube into a knot, and light the knot on fire. The tight paper will burn slowly, allowing more time for the wood to catch fire.
Tying the paper into a knot will prevent the layers from moving around when lit.
Use pine cones. Pine cones are quick to catch fire over tinder (such as pine needles). As well as being suitable kindling, they give off a great aroma.
Make the fire. Once you've assembled the tinder and kindling, you'll need to make a decision as to how to build the fire. There are quite a few ways to build a fire, each having its own utility dependent on where you are, the temperature and weather and the terrain, etc. Here are some articles to follow on to, which will explain how to make a fire successfully:
Enjoy a night under the stars next to the warmth of your new fire. Keep the fire well stoked by adding new fuel regularly throughout the time of the fire's use.
If the fire goes out, sometimes you can restart it simply be shifting around the coals and throwing on some more kindling to catch fire to the existing hot logs on the campfire.
Wet wood can be dried out next to a fire; sometimes you'll have no choice.