
How To Build An Upside Down Fire

This past weekend The Bug Out Bag Guide Family hosted a barbecue for some close friends. One of the highlights of this was testing out an alternative fire building method in our back patio firepit. Instead of building a standard teepee or log cabin we decided to try building what is called an “upside down fire”. We got some great, hassle-free results from this that we wanted to share with you. As I always say, it is always good to add new techniques to your survival skills. At the end of this article you will know how to build an upside down fire on your own!
Why build an upside down fire?
Over many years of camping I have built hundreds of fires. These were mostly of the teepee and log cabin variety, with some lean-to fires mixed in as the situation required. These fire building methods have served me well and I have enjoyed many a meal and evening sitting around their warm glow.
I was excited to learn about a new method of fire building and try it out for myself. What I learned from my test run, is that there are several advantages that an upside down fire brings to the table.

An upside down fire is self feeding
An upside down fire is built in a layered fashion starting with tinder at the top and increasing in size all the way to large logs at its base. One of the biggest advantages of using this fire building method is that as a layer burns it progressively ignites the larger layer below it. The tinder lights the kindling, which ignites the fuel wood, which in turn lights the logs. In other words, once an upside down fire is lit it will burn by itself for hours. There is no need to baby sit it and keep adding wood over time! You can light your upside down fire and then focus on other tasks like setting up camp, preparing food, or just relaxing with your fellow campers.
While traditional fires (teepee and log cabin) do progressively ignite successive layers (if properly built!) they tend to do this over a shorter period of time and require that a fire tender monitors the burn rate and add more fuel and eventually place logs onto the fire. The genius of an upside down fire is that it frees you from this chore!
Being self feeding makes an upside down fire an excellent choice if you want to keep a heat source burning through a long, cold night. As it is self feeding you will be able to build it before bed, light it, and then keep warm without having to climb out of your sleeping bag or shelter.

An upsidedown fire generates lots of coals
As an upside down fire burns it creates a large supply of coals from the logs integrated into the base of the design. These logs are lit as the flame consumes the fuel wood and transfers heat down to this base layer. These coals are excellent for most cooking purposes. With a good bed of coal you can:
- cook foil packets
- heat up a dutch oven
- barbecue meat, fish, or vegetables
- and much, much more…
With a traditional fire you would need to set up your teepee or log cabin and as they got burning need to continually feed it larger and larger logs to get a nice bed of coals going. The upside down fire does this automatically with the same amount of wood but far less active management. Set it up, go get your food ready and then come back to a nice bed of cooking coals!

Where can I use an upside down fire?
An upside down fire can be used pretty much anywhere you would build a traditional fire. It can be a great option for many applications:
- Survival cooking
- Camping
- Bonfire
- Barbecue
- Wood Stove
- In home fireplace
- Rubbish disposal
Can I build an upside down fire in a fireplace?
Yes! People often build them in fireplaces or woodstoves for the same reasons why they are used outdoors. Wood stove enthusiasts actually favor the upside down fire building method as it tends to heat up the chimney pipe faster than a traditional fire and by doing so increases the stove’s efficiency.

How to make an upside down fire
Here is a step by step guide for building your own upside down fire. Follow the written instructions and refer to the pictures if you run into any trouble.
Step 1: Clear your fire pit
You are going to lay your base layer of logs down in the next step so you will want your pit clear of debris and as level as possible so the fire you build will not topple over as you build it up.

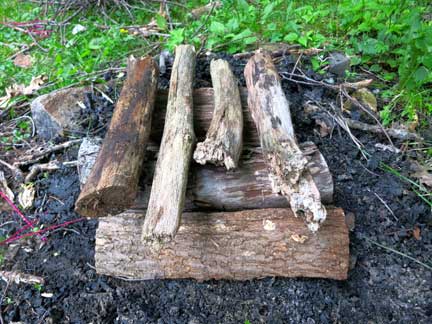
Step 2: Lay down the base logs
You are going to build your base layer first. This means use the largest logs you intend to burn and lay them down parallel to each other. Have the logs all touching each other so there are no gaps between them and it is best if the tops of them are relatively level with each other so you will have a nice sturdy base to build the rest of your fire upon.

Step 3: Thicker Fuel Layer
You are going to use large fuel wood for this layer, larger than your thumb. Remember, this layer has to be large enough to generate enough coals and heat to ignite the logs below it. Lay this wood in the opposite direction to the logs below it and allow space between each piece for air to flow. Feel free to build 1-3 layers of this sized wood if you have enough and if you have organized your wood build each layer upwards out of slightly smaller thickness pieces. Each layer should be laid down crosswise (perpendicular) on top of the layer below, similar to the method used when building a log cabin.
Step 4: Smaller Fuel Layer
You are going to repeat the process used in step 3 here but using smaller fuel wood, preferably smaller than your thumb in thickness. Once again build 1-3 layers of small fuel wood up with each being perpendicular to the last layer and slightly smaller thickness. You should have a small tower of wood now with the thickness of pieces used getting gradually smaller as you get nearer to the top.

Step 5: Kindling
Now you are going to start adding on the smaller wood that you have, kindling that is thinner than your pinky. Add 3-5 layers of this if you have enough to do so. By the time you get to the top layer the wood should be of the smallest thickness you have, no bigger than a twig. Stick to the same method of laying each layer down crosswise across the layer below it to allow proper air flow.


Step 6: Tinder
Choosing and adding your tinder is a crucial last step. You need something that is small enough to be ignited with your match, lighter, or firestarter but that will burn long and hot enough to get your kindling to start burning. Place this tinder on top of your kindling. Here are some suggestions for kindling that have worked well for me in the past:
- Dryer lint
- Birch bark
- Paper
- Cardboard
- Commercially available firestarters
- Cotton balls soaked in vaseline
- Bird’s nests
- Dry Grass
- Coconut husks
- Pine needles
- Punk wood
- Cattail fluff

Step 7: Light And Enjoy!
Shelter your match and tinder from any wind (If you are lighting your fire with an EverStryke Match, you don’t need to worry about this) and get that fire started. Depending on what tinder you chose you may need to blow gently to get the tinder going. As the fire burns each layer that you built should ignite the next one down all the way to your base layer of logs. In my testing an upside down fire built as I have described should burn for well over an hour and result in a large layer of coals all ready to cook your meal. Enjoy!

Your Turn!
So, now you know how you build your own upside down fire. I encourage you to give it a try next time you are camping or setting up a backyard bonfire. It is a great tool to add to any fire building arsenal and I think you will be impressed with the results.


No comments:
Post a Comment