
Tarp Shelters
I thought I'd write a bit about one of the most basic, overlooked and old fashioned bits of gear around, the simple tarp.
On trips I've always liked to sleep out on the ground or under improvised shelters of one type or the other, while it seems every single friend of mine has preferred a tent.
But in this day and age of ultra-high-tech, expensive, high-speed-low-drag, designer label, not-just-lightweight-but-ultra-light and over-complicated gear, I find it enjoyable and useful to get back to basics now and then.
After all, one of the reasons I enjoy the Green World so much is that it is an escape from the complicated world we humans have created for ourselves, and once in a while it's nice to leave the complications behind.
Certainly, I think it's a good idea that every outdoors-person should be well enough acquainted with this simple yet versatile piece of gear to be able to readily fashion one into a comfortable shelter in a short period of time.
I think it's a good idea to introduce young people just starting out camping to this type of shelter first. This gives them proper training and a grounding in shelter making basics, and accustoms them to sleeping in a more open environment, as I really think most peoples insistence upon tents is almost entirely psychological.
So what are some of the advantages of a simple tarp shelter?
Low Cost.
No other portable shelter is as inexpensive, which is a great advantage for young folk just starting out as well as refugees the world over.
Also, if one looses interest in camping, you haven't wasted much coin.
Low Weight.
Tarps are lighter then tents, sometimes much less so depending upon what material the tarp is made out of. This single fact alone is reason enough to make the tarp an ultra light backpacking favorite.
Cooking.
You can easily cook under one, A great rainy day advantage.
Camp fires.
Where appropriate , you can build a fire in front of one, which is nice in cold and wet weather,.
Of course you can build a fire near a tent, but those expensive nylon tents don't react well to flying sparks, and they don't concentrate the heat of a fire anyway. Burn a hole in a cheap tarp and all you have to do is simply patch it with duct tape.
A properly rigged tarp can reflect the warmth of a fire and create quite a cozy little sanctuary.
Closeness to Nature.
After all, this is why we're out there, isn't it? So why enclose yourself completely in a nylon envelope if you don't have to.
Under a tarp you can have shelter and still see the wind and rain, taste the air and see the stars. One is still part of the great outdoors.
Inside a buttoned up tent, you might as well be in your backyard.
Of course tarps are not perfect shelters. If they were tents would never have been invented.
The flip side of the tarp coin is;
Bugs.
This is perhaps the single biggest complaint of tarp shelters.
If the blackflies are so thick you get twenty calories of protein with every breath, or the mosquitoes so bad your hiking companions look pale from blood loss, then a tarp might not be the best idea.
Above The Tree Line.
It's nice to have a handy tree or two to string a tarp from. This is where the weight savings really shine.
Tarp shelters can be used in treeless areas of course, if you are willing to carry poles or spend some time looking for sticks.
But there are times when a true freestanding tent is called for, like crowded camp grounds or when a storm is trying it's level best to blow you off a mountainside, or really wet weather when the rain and wind is swirling around, constantly changing direction from every compass point, or when it's so cold out you need to conserve every last calorie of heat.
Skill.
Tarps take more skill to use. You have to know a few knots for one thing, and every time you set one up you have to decide how best to do so, taking into consideration the weather and the surroundings. You have to look for not only an nice flat spot with good drainage and no deadfalls ready to come down on it, but also handy trees, bushes, rocks or whatever to hang the tarp from. Which way is the wind blowing? Will it change direction after nightfall? Need to cut or find poles? With a tarp, taking advantage of natural windbreaks, dips in the terrain and so forth is far more important.
With a tent, you couldn't change things around even if you wanted to. All the design and engineering has been done for you, and all you do is assemble it, the same way you do every time you use it regardless of the conditions or location.
Well, with knowledge and practice comes skill., so let’s dig out a tarp and play.
The tarp I'm using here is from Harbor Freight. It's 9'6" by 7' 4" and cost me $6.99. According to harbor freight it weighs 1-3/4 pounds, but I didn't weigh it.
I think this is a decent size for a nice solo shelter.
If facing really bad weather or new to tarp shelters bigger is better, but inexpensive woven poly tarps are kinda heavy for their size. Something on the order of 8’ x 10’ seems like a good compromise.
Tarp, plenty of para cord, ground sheet, and eight stakes. Weight for the mess is just a tad over three pounds.

Three pounds isn't bad for the weight of even a solo shelter, but it really isn't any better than many solo tents. If we were using an expensive coated nylon tarp and simple plastic ground sheet we could cut a pound off this weight, and if one spent the coin on a Silnylon tarp we could really get the weight down. Still, this cheap tarp will do nicely for several seasons if well cared for, and you can outfit a whole scout troop for the price of a single solo tent.
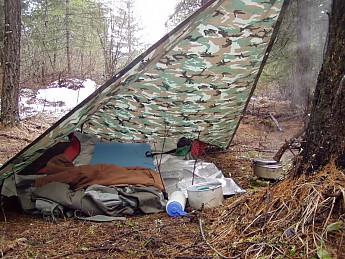
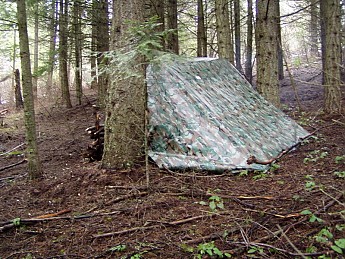
This first pitch is sometimes called the diamond pitch. It's one of my favorites because it's so easy to do and really blocks the nasty weather.
So you find yourself walking along in high wind and maybe rain, and are fixin' for a break. This is so fast to rig there is no reason not to put up the tarp this way even for a lunch break.
Start looking for a likely looking tree with a flat spot before it.
Put your back to the wind and walk right up to that tree, and drop your pack, leaning it against the handy tree.
Open the top of the pack, and take out your tarp. Tie a corner of the tarp to the tree. Of course, you already have short cords tied to the corner holes in the tarp, so this is done without having to fumble cord out of the pack. Grab your bag of stakes out of the pack.
Now walk backward into the wind, pulling out the tarp as you go, and stake down the opposite corner of the tarp firmly.
Now the tarp is captive, and although it may flap a bit the battle is over. Now stake out the two sides of the tarp and you’re done!
Get under it, spread out the ground cloth, open your mattress pad and relax. Light the stove and cook dinner or lunch.
Like many tarp pitches, this probably works better with a square tarp. With a rectangular tarp such as this one side will be more open than the other.
Nothing to worry about, just angle the tarp so that side is a little more sheltered, and you put your stove there.
In really bad weather you keep the tarp pretty low to the ground. In better weather you can tie it higher to the tree for more head room under it.
It's more sheltered then it looks. What you get looks something like this -
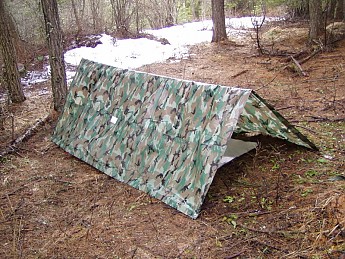
Next, we should mention one of the oldest and most basic pitches, the simple A pitch.
This is simplicity itself. Just stretch a rope from two handy objects, throw the tarp over and stake it out.
With a well tensioned rope and eight stakes, this is perhaps the sturdiest pitch there is, and it probably provides the best shelter.
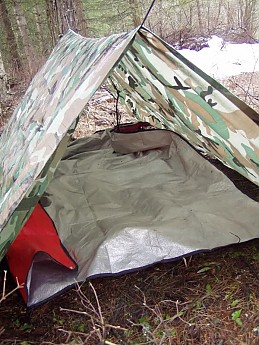
One open end can be mostly closed simply by pitching that end of the tarp real close to a big tree or bush. The opposite end can be blocked with your pack or rain gear as needed.
It is nine and a half feet long though, so little rain will blow in and reach you.
What this doesn't have is much head room, so it's better for sleeping then for cooking or other camp chores.
Recently I slept under a tarp like this with my three nephews. Two people per opening, and our feet met in the middle. It worked very well and was a very simple and lightweight way to shelter four people.
What if you find yourself in open terrain without any trees handy? Well, you’ll have to find a stick or two.
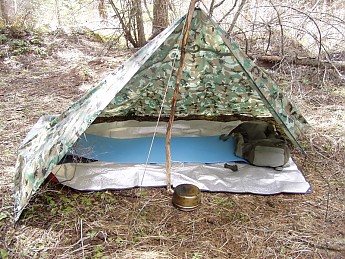
For a one-stick pitch, stakeout one long edge of the tarp first. Then lift the center of the opposite long edge with the stick, and hold it upright with cord and a two stakes set in a V. I think of this as the Pyramid Pitch.
With this particular tarp there is no center grommet, so I cheated and my pole isn't centered, so one side doesn't reach the ground.
I may have to put a new grommet in the center of this tarp and experiment more with this pitch, it looks promising, but to be honest I’ve never spent the night under this arrangement
One long, sturdy stick can also be used for the diamond pitch show at top, and with two sticks and plenty of cord and stakes or other things to tie the cords off to, one can also manage an A pitch. The A pitch is by far the hardest to do without trees though, because the ridge line needs to be pulled very tight for it to be sturdy, and your end sticks will want to fall over unless staked or tied up very firmly. When using sticks I’d stay with some sort of one-stick pitch unless I had lots of practice first.
Now we come to an oldie but goodie.
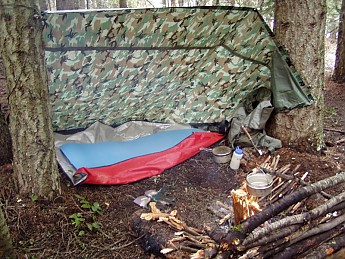
This is the lean-to pitch.
Using a cord suspend one long edge between two trees.
Pull the tarp out at a 45 degree angle, and stake down the opposite side.
I modified the pitch here, and folded one side over for a corner.
This is the lean-to pitch.
Using a cord suspend one long edge between two trees.
Pull the tarp out at a 45 degree angle, and stake down the opposite side.
I modified the pitch here, and folded one side over for a corner.
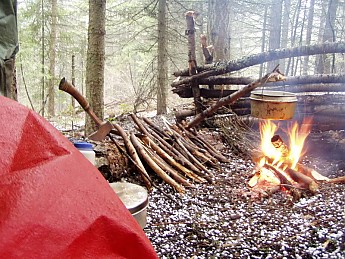
This pitch is more open than the others but it is an all-time favorite if you are in an area where you can build a fire.
With a bright fire before the tarp the heat is nicely concentrated by the tarp and it's very warm.
The little wall behind the fire not only reflects some heat, but helps create a backdraft and keep the smoke out of the shelter.
Ah, this is the life. Now all camp chores can be done sheltered and warm. It was so comfortable here relaxing with my boots and coat off that I almost fell asleep.
Then the wind changed...
As I was relaxing the gentle breeze picked up and changed direction. The shelter filled with smoke. No worries, you have to be philosophical about this sort of thing.
Ah well, nothing is perfect.
I rolled over and faced the back of the shelter where there was no smoke. My eyes closed...
And a flash lit the shelter, clearly visible though my closed eye lids!
Huh? someone taking a picture with a flash?
KABOOM!!
Nope. That was thunder, and close by! The lighting struck, the thunder boomed, and marble sized hail stones came down in a torrent and bounced all around.
I pulled the edge of the ground cloth over me to keep off the ricochets.
Camping with a tarp shelter I think it is a good idea to use an oversized ground cloth that can go around your sleeping bag!
So I lay there before my fire and watched the storm, warm and comfortable, with the whole forest open before me.
Nope, you don't get a view like that in a tent.
You can spend allot of coin on fancy modified tarps. They look like bat wings, A frame tents without the walls, pyramids with a central pole, and just about every shape imaginable. Although they certainly are lighter than a woven poly tarp of equal size, are they really any better shelters?
Properly setup and used, they all will keep you dry in a rainstorm and let you cook a meal over your stove. None will protect a person from bugs, and that is the biggest complaint I hear about tarp shelters, and none will match the versatility of a simple square or rectangular tarp, once you learn to use it properly.
OK everyone, let’s see your tarps and hear your tarp-ing stories!


No comments:
Post a Comment