Three Essential Campfires: Snack Fire, Cooking Fire, and Comfort Fire

You can tell a lot about a camper’s experience by the type of fires they build. Inexperienced campers usually build the same, heaped together bonfire for all their campfire needs. Sure, building huge ass fires is fun, but it’s extremely inefficient. The typical bonfire campfire burns a lot of wood, wastes heat, and isn’t very good for cooking food.
Experienced campers, on the other hand, build different campfires depending on their needs. These campers understand that when you build the right fire for the right time, you get the most efficiency out of it, the most comfort, and the most pleasure.
Below we’ve outlined how to build three different campfires for three different purposes. First, we’ll show you how to build the small snack fire. Next, we’ll discuss how to create the perfect fire lay for cooking. And finally, we’ll take a look at how to build a campfire for warmth and comfort after a long day spent hiking.
Snack Fire
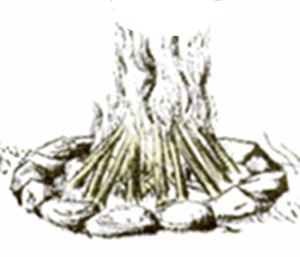
 Sometimes you just need a fire big enough to warm a pot of coffee or fry the afternoon’s catch. Or perhaps you’re not setting up permanent camp at a stop. You don’t want a fire that’s so big that cleaning it up when you leave consumes too much time. Enter the snack fire. The snack fire is just a basic tepee fire lay. It’s small, but very efficient.
To build it, simply start by placing small twigs up against each other until you form a mini tepee. Leave an open space in the center where you can place the tinder. Newspaper balls, dry leaves, and dry pine needles work best. With practice, you can start a small fire in seconds. To keep the fire going, keep adding small twigs to the lay.
To use it to boil some water for your coffee or broil some bacon, wait until the tepee falls and then put your frying pan or kettle right in the center. Keep adding little twigs around the pot to increase the heat.
That’s it! While this fire won’t keep you very warm and it isn’t large enough to cook much, it’s a good fire to use when you need one quickly or just want a little warm comfort on your travels.
Cooking Fire
 You should implement the cooking fire when you plan on staying in a location for more than a day and you want to do some serious campfire cooking. Campers often try to cook by placing their pots and pans directly into the fire. But this typically achieves less than satisfactory results, burning both pans and food. This leads some to tote along a camping stove. But you can make an effective campfire cooking range out of all natural materials.
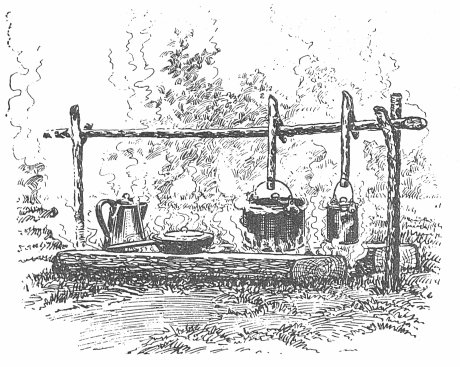
Start off by building a tepee fire. Make it a bit larger than you would for a snack fire. When you get a good fire going, lay two green logs side-by-side about 7 inches apart at one end, and 4 inches at the other. The two logs serve as a stove range where you can place pots and pans. You can put your smaller vessels like a coffee pot on the narrower end, and your larger pots on the wider end. This enables you to cook several dishes at the same time. Spread or pile the coals to create hotter or cooler cooking areas.
If you want to make it a bit more elaborate, you can rig up a pole over the fire as seen in the picture. Then you can then hang your pots a couple of inches above the fire for care-free simmering.
Comfort Fire
 What if you could bring the comfort and warmth of a fireplace with you on your camping trip? Well, with the reflecting fire you can. On a cold night you need more than just a simple tepee to keep you warm. You need something that will focus the heat directly at you. The problem with most campfires is that it throws heat off in all directions. A reflector fire lay solves this problem by replicating how a fireplace works. Fireplaces have a backdrop that reflects heat back towards the house. The reflector fire does the exact same thing.
You can use any fire lay to make a reflector fire- tepee, log cabin, star fire, whatever. We’re just going to place the fire in front of a backdrop to reflect heat.
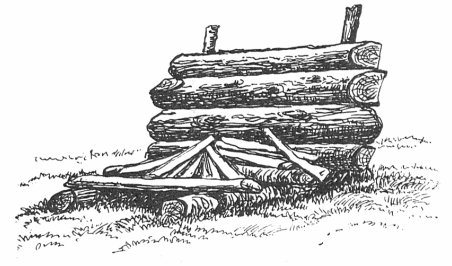
Try to find a natural reflector to build your fire in front of. A cliff, larger boulder, or earthen bank will work. If you can’t find a natural reflector, build your own by driving two hearty stakes into the ground at an angle in front of your fire. Against these slanted poles, stack up a row of logs from largest to smallest to form a backstop that will serve as the reflector. Use only green wood so it won’t burn.
Now you can sit on your tree stump, eat s’mores, and enjoy the warmth and comfort of a fireplace out in Mother Nature.


No comments:
Post a Comment