Wednesday, 18 April 2018

A BEGINNER'S GUIDE TO WILD CAMPING

Wild Camping | beginners

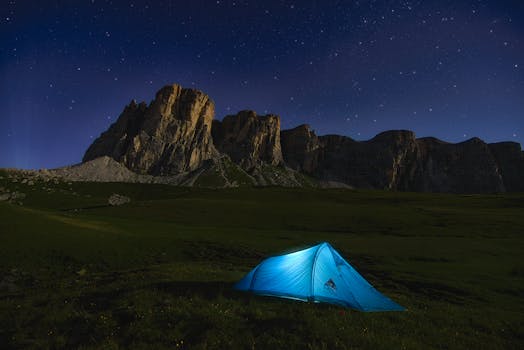
Spending a night under the stars away for civilisation is a feeling money can’t buy, it allows you a sense of freedom for the body and mind, as well as a sense of achievement, it’s the ultimate GetOutside adventure.
Wild camping is something everyone should try to sample at least once, and remember we’re discussing Wild Camping the Mud and Routes way, not the ‘other’ kind in laybys and the like!

WHAT SKILLS DO I NEED?

bochlwyd_wildcamp-1-of-2.jpg
If you’re a seasoned hill walker, then you’ve got the trickiest part sorted. The hardest part of most mountain trips is the navigation, and if you’re wild camping properly then you’ll need to go places where some map reading skills are essential. Beyond that, you’ll need to choose your kit wisely and learn how to use it.
It should go without saying that you need to be able to pitch your tent in any conditions that you expect to encounter, even if that means you’re pitching in the garden with the sprinkler on full pelt.
You should also make sure that kit’s suitable for the type of conditions you’re going to be camping out in. You can either cook already, or you can’t. If you can, then wild camping is an opportunity to be creative. For everyone else, there’s always dehydrated food.
Beyond that, you just need to be able to sleep in a tent. Our own Dave Roberts loves wild camping, but admits that he sleeps awfully in a tent without a few single malts to set him nicely off. We don’t believe a word of it!

WHAT EQUIPMENT DO I NEED?

To start with, you’ll need everything that you generally take on a day walk, plus a few choice spares. The main kit you’ll need are the ‘Big 3 items; tent, sleeping bag and rucksack.
These are the heaviest and often your biggest investment financially, so it’s well worth taking some time and googling any item that takes your fancy. The guide that follows gives you a quick overview of what to look for: Your First Wild Camp.
Don’t automatically think that this is the money no object outdoor adventurer activity though, as we’ve proven before at Mud and Routes you can achieve wild camping on a budget.
“But what about my luxuries?” we hear you say. Fear not, there’s no reason why you can’t make wild camping that bit more comfortable too if you go in for that sort of thing. Roasted coffee, tables and chairs, even popcorn and projected movies!
We’ve become so proficient at it here at Mud and Routes that we’ve coined a category for it, Wild Glamping! Check out our adventures for some inspiration, and let us know of any we haven’t thought of! Five Things That Make A Luxury Wild Camp.

WHERE DO I GO?

Just to be clear from the offset Wild Camping is only legal in Scotland and Dartmoor National Park! For the rest of the UK wild camping is ‘technically’ illegal without the landowner’s permission, so please only pitch up if you get the permission to do so first.
If you’re looking for tried and tested wild camping sites check out the Mud and Routes UK wild camping map - Wild Camping Map.

WHAT MAKES A GREAT SPOT?

Just remember, you’ll rarely find a pitch that meets all these crieteria! A Summit pitch with a view will not be sheltered or have running water – but on a still evening it’s worth lugging that water up!
  1. Near a source of water.
  2. Dry Pitch – Ensure that the water supply isn’t too nearby!
  3. Flat Pitch – Any lumps and bumps will make for an uncomfortable night’s sleep.
  4. Pitch with your head uphill! Even if you’ve got the best sleeping mat in the world and can overcome a bumpy pitch, make sure your head isn’t downhill if you must use a sloping pitch. Pitching sideways on to the slope will guarantee you’ll be rolling off the sleeping mat at regular intervals.
  5. Sheltered – Any sort of breeze makes lightweight tents sound like a load of crisp packets.
  6. View – Camp as high as possible to enjoy the view. Failing that, you should try and pitch where you catch the evening rays or if you’re a morning person, facing east to enjoy the sun in the morning. Pitches with views often pose problems with points 1 through to 5!

DO’S AND DONT’S

- Camp high, not in a field full of grazing cows next to the farmhouse.
- Set up camp late and leave camp early.
- Fires are generally a no-no. Fires on a shore might allow signs to be washed away, but we would advise a cooking stove not a fire.
- Though in dry spells, which may be a rarity in Britan these days, you’ll need to be extra careful with your cooking stove in case you start a grass or heather fire. Avoid such areas if the conditions are extremely dry.
- Leave no trace. Your site should not be an obvious campsite the next day. Take all your litter out, as outlined here.
- Human waste also needs to be dealt with, the full Mud and Routes guide on that delicate subject can be found here, which includes the use of sphagnum moss!
Persuade your day walking buddies to wild camp. Some people in your walking circle won’t understand the joys of wild camping, share this with them to make them see sense

Tuesday, 17 April 2018

Camping Knots for Wilderness Survival

Knowing how to tie good camping knots is an invaluable skill in wilderness survival situations. Its also a great asset when having fun in the outdoors. There are a wealth of different knots out there that you can learn to tie. With so many different knots, you might find it hard to choose which to learn first. Here are 3 of the most useful knots for camping and wilderness survival.

Three Useful Camping Knots:
Square knot

Also called a reef knot, this knot is useful for tying bandages, packages and joining shorter pieces of rope together. It is excellent for joining sections of survival cordage.
camping knots square knot
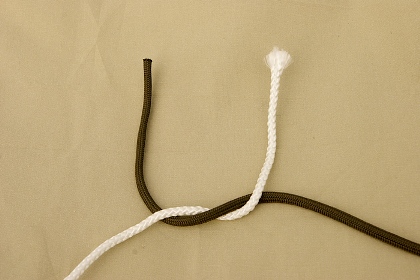
To begin, lay the ends of the ropes parallel and then pick up a rope in each hand.
camping knots square knot
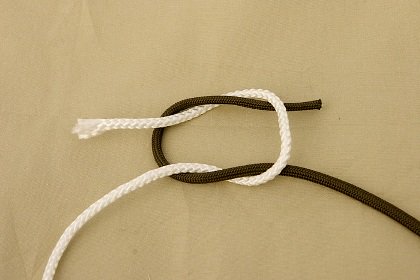
Now tie an overhand knot as you would for tying your shoe laces by putting the right end under and over the left rope end.
camping knots square knot
Then tie another overhand knot, this time putting the left end under and over the right rope.
camping knots square knot
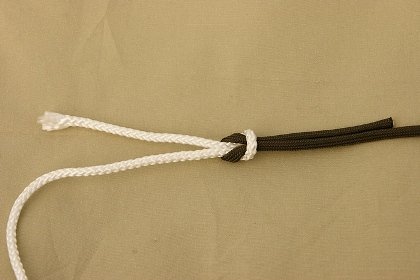
Completed Square Knot

Clove hitch

Like all hitches, this knot ties a rope to an object. The word "clove" comes from the word "cleave" which means to hold fast. This knot is used to start and finish all types of lashings, including lashings for survival shelters.
camping knots clove hitch
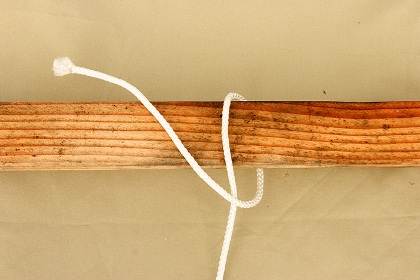
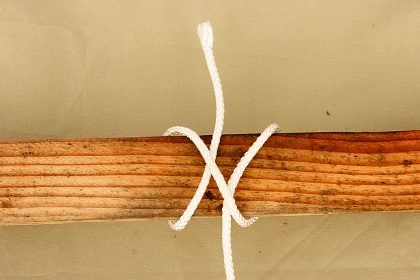
To begin, bring the rope end over and under the post. Next, take the rope around a second time, crossing it over the first wrap to form an X on the post.
camping knots clove hitch
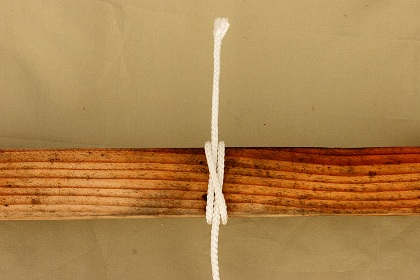
Now, bring the rope end around a third time, and tuck it under the center of the X.
camping knots clove hitch
Tighten by pulling the end and the main line apart.

Bowline

One of the most important knots to learn is the bowline knot. Because it does not slip, it is a great knot for all sorts of uses including securing tarps, lifesaving operations, and mountain climbing.
camping knots bowline
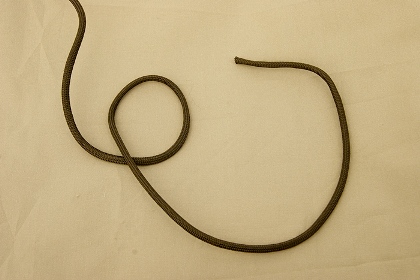
To start the bowline, first make a small loop on the rope.
camping knots bowline
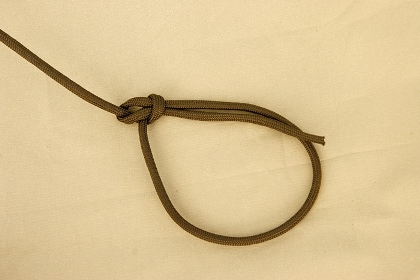
Take the rope end through the loop, around the main line of the rope and back down into the loop.
camping knots bowline
Try to remember "the rabbit comes out of the hole, goes around the tree and then back down into the hole."
camping knots bowline
To tighten, pull the main line of the rope away from the loop.
Knots are often an essential skill for wilderness survival situations. They are also excellent tools to help you have a fun and safe time in the outdoors. Practice these knots, and you will soon find many more uses for them!

Sunday, 15 April 2018

HOW TO START A CAMPFIRE IN THE RAIN

Huddling up around a campfire with a few close friends on a cool, clear evening is one of the few parts of a camping trip that borders downright luxurious. Though a good campfire may feel like a luxury in the best of circumstances, in the worst it's an absolute necessity. One of the great ironies of camping is that those times when you most need a good fire -- when conditions are cold, damp, and windy -- are the same times that one is most difficult to start. Additionally, the ability to start a fire in adverse conditions is a camping skill that many campers neglect until it's too late.
How to start a fire in the rain

If you're a camper that doesn't already have a plan to get your fire started when conditions are less than ideal, read on and we'll teach you how to start a fire in the rain.

HOW TO START A FIRE IN THE RAIN - RULE #1: LOCATION, LOCATION, LOCATION


The most basic -- and one of the most frequently overlooked -- elements of successfully building a fire in wet or otherwise difficult conditions is to carefully consider exactly where you'll be building it. A good location for your fire will make both building and maintaining it much easier, and will ensure that you don't waste a ton of time and energy on a project that was doomed from the outset. The most ideal location for your campfire will provide protection from wind, rain, and groundwater, any one of which can derail your fire-starting project if you haven't found an appropriately dry and windless spot.
In order to shield your fire from wind, try to build it on the downwind side of a hill and immediately downwind from large obstacles, like rock formations. If no natural windbreaks are available, you can create your own with with a tarp and a few sharpened sticks, sort of like a miniature fence. Keep in mind that sheltering your fire on the upwind side may not be enough, as more forceful winds will often make their way around the sides of the windbreak, still interfering with your fire. To combat this, create a C-shaped windbreak around your fire with the opening on the downwind side.
Sheltering your fire from falling rain is probably the most difficult requirement for a good campfire location, as you'll have to find a way to do so while also allowing the smoke generated by the fire to escape. Large evergreen trees tend to form a good shelter for fire building, as their shape forms a sort of natural roof. The shape of trees like pines and spruces will direct water outward and away from your fire while still allowing smoke to escape. In order to use one as a shelter, crawl underneath its lowest branches (You can cut a few off if necessary, but make sure that the extremities of the lowest branches still touch the ground below. Of course, building a fire underneath a live tree is inherently risky, but a well-constructed and controlled fire shouldn't provide a serious risk in rainy conditions. Just take all the precautions you normally would, like removing all potentially flammable debris from the ground around the fire and ensuring that there are no low-hanging branches directly above the fire.
Protecting your fire from groundwater is probably the easiest of these three requirements to fulfill. Simply build a fire pit with rocks filling the center, instead of just forming a ring around the edges. This will separate your lowest coals from the wet ground below, and allow more air to reach them, helping your fire to burn effectively.

HOW TO START A FIRE IN THE RAIN - RULE #2: FUEL FOR THE FIRE


Now that you've found and prepared a location for your fire, you'll need to find some tinder and kindling to get it started, and some fuel to burn once you get it going. The tinder will need to be something that ignites easily, while the kindling will be small pieces of wood that you can easily light with the tinder. The fuel will be the larger pieces of wood that will become the coals of your fire.
You should always carry along tinder on your own camping trips, just in case there's no dry brush or other readily combustible materials nearby. Two of the best forms of tinder for starting a fire in the rain are easily made at home, and won't take up too much space in your pack: Paraffin wax melted into dryer lint or, alternatively, cotton balls soaked with petroleum jelly are both easy to ignite, and will both burn for at least a couple minutes -- long enough for you to ignite your kindling.
Dry kindling shouldn't be too difficult to find even in wet conditions, as long as you know where to look. If you've found a large evergreen tree under which to build your fire, there's a good chance you'll find some kindling there, too. Just look for small, dead branches in the dry area underneath the tree to get your fire started. If you can't find enough kindling there, try looking underneath dead or uprooted trees. While the tops may be wet from the rain, there's a good chance you'll find some dry wood that's suitable for a fire inside or underneath them.
Try looking in the same places that you did for kindling to find larger pieces of wood for fuel. These won't be quite as readily available as kindling, but they also won't need to be quite as dry, since the heat from your kindling will cause some of the moisture to evaporate.

HOW TO START A FIRE IN THE RAIN - RULE #3: LIGHT IT UP


Now that you've found the appropriate location and materials, it's time to get that fire going. As one of the 'Ten Essentials,' you should have a firestarter in your bag, whether it's a lighter, matches, or a ferro-flint rod, or whatever else you choose to us. If you don't currently carry one of these, you should. And -- as always -- make sure to clean up after yourself and ensure that the fire is completely extinguished before leaving the area.

Friday, 13 April 2018

Survival Techniques: 5 Basic Survival Skills

Survival techniques are a-plenty, but regardless of which specific one, there are 5 Basic Survival Skills that everyone who ventures into the Outdoors should understand and be fully aware of their potential need and use. This is a just brief outline, not a full explanation of all the requirements and items required in each category. One of the most important elements to survival is between your ears, your brain. Of all survival techniques, the most important is DO NOT PANIC, use your wits and practice all elements of the 5 basic survival skills before you may need to rely on them.

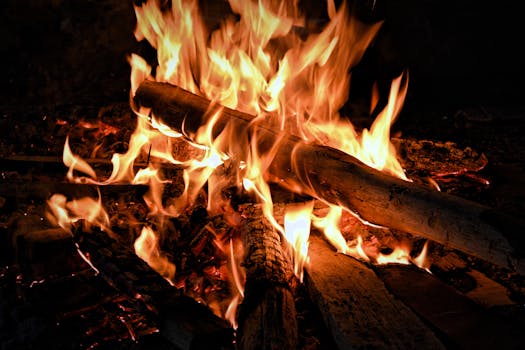
Bonfire during Nightime

Basic Survival Skill 1: FIRE

Fire is the king of survival techniques! Fire can purify water, cook food, signal rescuers, provide warmth, light and comfort, help keep predators at a distance, and can be a most welcome friend and companion. As a survival technique, it is one that is essential. Each and every person who ventures into the Outdoors should have a minimum of two ways to start a fire with them, one on their person at all times and the other with their gear. A few small fires provides more heat than one large fire. Collect firewood you think you will need for the night and then collect the same amount again, experience shows you will need it. Conserve fuel by making a "star fire"; where the ends of large logs meet in the fire only, push inward as more fuel is needed. Make a reflector from your SPACE BLANKET on the back wall of a shelter to reflect heat of your survival fire to your back, sit between fire and back shelter wall.

Basic Survival Skill 2: SHELTER

SHELTER is the survival technique by which you protect your body from excess exposure from the sun, cold, wind, rain or snow. Anything that takes away or adds to your overall body temperature can be your enemy. Clothing is the first line of shelter protection, have the right clothes for the right environment. Always have a hat. Try and keep the layer closest to your body dry. Layers trap air and are warmer than one thick garment. Do not expend energy making a shelter if nature provides one. Practice building a quick lean-to shelter in case you can not find your campsite, do not wait until you need to make one. Use a SPACE BLANKET to prevent dampness or to insulate your shelter or to wrap yourself up in a sitting or squat position to concentrate your body core heat.

Basic Survival Skill 3: SIGNALING

SIGNALING is unique among survival techniques in that it gives you the means and ability to alert any and all potential rescuers that you are in need of HELP. Fire, flashing light, bright color markers, flags, mirrors, whistles all will help you be found. Three fires in a triangular form are a recognized distress signal. Carefully bank your signal fires to prevent igniting surrounding area. Use regular signal mirrors only when you can see a plane, or people in the distance. Use EMERGENCY STROBE light at night to help attract attention from those that may be in the area. Make smoky fire with organic material over the fire during the day to attract attention. Lay out ground to air signal in open field, S.O.S. from rocks, logs or colored clothing, whatever will be seen against the background. Most search and rescue parties use aircraft as a primary method of sighting.

Basic Survival Skill 4: FOOD/WATER

FOOD/WATER are vital towards your survival. Ration your sweat not your water intake. Try to drink only in the cool of the evening. You can live up to three days without water. DO NOT eat plants you do not know. Never drink urine. Always assume that you will need extra food and water when you plan your trip. Pack energy bars and candy in your pockets at all time, just in case. If possible boil all water 10 minutes plus one minute for every 1000 feet above sea level. Strain water through your handkerchief to remove large particles. Try to drink only in the cool of the evening. Never wait until you are without water to collect it. Have some poly zip bags to collect and store water. Never eat any wild berries that you are not sure of what they are. You can catch rain water in your SPACE BLANKET by laying it out in a trench.

Basic Survival Skill 5: FIRST AID

FIRST AID as a survival technique is not just the basic medical needs, it is the primary way in which you act to survive. DO NOT PANIC, remain calm and do what you have to do to take care of YOU. STOP means Sit, Think, Observe, and Plan. It is the most intelligent thing you can do when you realize you are lost or stranded. The most important element is to keep your brain functioning rationally, this is basic first aid for survival. Analyze your needs before every trip, create a medical checklist and carry a small personal kit with you at all times. Most survival situations require only dressing for small cuts, bruises and personal medication needs, make sure you know what you have with you and how to use it. Do not over pack, pack what you feel you will need to carry with you at all times. Concentrate on being found, pack a picture of your family in with your gear to remind you of the reasons to remain calm and to survive. Prevent hypothermia by insulating yourself in a SPACE BLANKET.
First published on Get Ready Industries. Article reprinted with permission. GetReady! Industries has lots of great ideas and products for being prepared for an emergency. We thank them for sharing this very "laymans" basic survival techniques guide.

Thursday, 12 April 2018

Best Wild Camping Tents

If you don't mind sacrificing your usual day-to-day comforts and conveniences and want to explore more of Scotland that very few get the chance to visit, then wild camping is definitely something for you. Brave the conditions, read our top picks, and try some this spring!
It's a great way to discover remote parts of our stunning landscape and get closer to nature, as well as giving you the chance to feel the benefits of getting out there and being able to wake up with beautiful views right outside your door. Plus, the experience definitely comes with a great feeling of adventure!
Free stock photo of dawn, landscape, nature, sky

With wild camping, your key consideration should be about the weight of the kit you'll be taking with you. You'll need to be able to carry whatever you'll need for your long weekend adventure, or Munro bagging trip. If you want to get to those remote and beautiful wildernesses, you have to be able to carry your pack – with clothes, equipment and a tent – all the way there. To help you decide which tents are best for your next trip away, we’ve compiled this list which ranges from budget, lightweight tents to high-spec, super-light models for the wildest camping you can dream up.
Before you set off, make sure you're prepared for all weathers and changing conditions. Keep in mind the guidelines of the Scottish Outdoor Access Code and 'leave no trace'. It's up to you to keep our wild spaces protected for the next generation, so be mindful of taking litter away with you and be respectful for the environment. Keep reading to see our list of the Best Wild Camping Tents.

Salewa - Litetrek II Tent - £240

Designed specifically for lightweight trekking and alpine terrain, Salewa's Litretrek II provides excellent protection against the elements. Coping well with conditions throughout the year, and boasting a three season specification, this tent is ready for camping adventures during the milder months, but will also be a great lightweight option for the early winter. Weighing only 1.7kg, and a construction that is self supporting really makes this tent a great choice due to how easy it is to pitch and pack away. 

Hilleberg - Nallo 2 GT Tent - £835

At the higher end of the pricing scale, the Hilleberg Nallo 2 GT is the perfect choice for all year camping adventures. Both being exceptionally lightweight for it's size at only 2.9kg and performing incredibly well in wind tunnel testing, the extra cost of this tent vastly makes up for itself when you see how well it can cope in any conditions. Made from Kerlon 1200 fabric, with an inner area of 2.8 square meters as well as a vestibule area of 2.2 square meters, this is a great option for those who like plenty of space for their kit. 

Berghaus - Grampian 2 Man Tent - £239

Although being slightly heavier than the two picks above, the Berghaus Grampian 2 Man Tent performs well under test conditions, and boasts a quick pitching time of only five minutes. The Geodesic pole structure provides superb stability in windy conditions, and inside the tent, there are separate living and sleeping areas both with a mesh lining to help the natural light get through, but not any of those typically Scottish midgies! Great for all year use, this tent will keep you warm in the winter, but also has excellent ventilation options for the summer months. 

MSR - Elixir II Tent - £225

As a mid-range option for any adventure, the MSR Elixir II is surprisingly lightweight and very easy to assemble. When we took this tent out to test in February, despite the blustery conditions, this tent was perfectly stable. Weighing only 2.64kg, the tent is great for backpacking and fantastic value for all the features. The solid canopy fabric provides ventilation that is so versatile, you could use the tent anywhere at any time and be completely at ease. With multiple set up options and a 2 door entry system, this tent is one of our favourites for the season!

Berghaus - Peak 3.2 Tent - £139

Despite being the cheapest in our selection, the Berghaus Peak 3.2 2 Man Tent is a distinctive blend of lightness and all season stability and performance. A popular tent among those who need a tent to be versatile for their adventures, weighing 2.46kg with an easy pack compression bag, this is a great option for backpackers. The tunnel construction maximises space while not compromising on stability, and an angled floor plan allows you to make the most of the combined living and sleeping space. 


If you're wanting to make the most of the Spring weather, then get geared up and plan a wild camping adventure. 

Wild Camping Tips and Kit List

The first rule of Wild Camping club is...  actually really simple! Leave No Trace: if you take it in, you carry it out. What is wild camp...