Thursday, 5 April 2018

How to Choose and Use Gaiters


 Snow, water, dirt and pebbles have a way of sneaking into even the most waterproof of boots. To prevent this, put on some gaiters. Gaiters cover the vulnerable tops of your footwear to fully protect your feet from the elements.
Gaiter shopping is not complicated. To choose the right gaiters for you, consider the following:
  • How you'll use your gaiters: The kind of trip you have planned can determine the type of gaiter you need.
  • How tall do you want your gaiters? Tall gaiters and short gaiters have very different end uses.
  • What features do you need? Choose features like waterproof fabric, top closures and instep straps.
To get the best performance out of your gaiters, see the Gaiter Tips section.

Choosing Gaiters by Activity

a snowshoer making their way through deep snow with gaiters on
 
The right pair of gaiters depends on the kinds of trips you have planned and the weather and trail conditions you expect. The main uses include:
  • Hiking: Gaiters for hiking are typically lightweight and breathable, and offer basic protection against rocks, grit and light rain while on mild-weather excursions.
  • Backpacking: Gaiters for backpacking offer slightly more protection against rock abrasion and water than hiking gaiters. These are designed for all-around hiking and can also be used for snowshoeing, mountaineering and cross-country skiing.
  • Mountaineering: Gaiters for mountaineering provide heavy-duty protection and some add insulation for extended trips in harsh conditions. Most feature a waterproof, breathable fabric for superior comfort and protection.
  • Snowsports: Gaiters designed for snowsports like skiing and snowshoeing often have waterproof, breathable fabric to keep moisture out, but aren’t always as durable as gaiters designed for mountaineering.
  • Ice climbing: Gaiters made specifically for ice climbing often feature waterproof fabric and durable reinforcements.
  • Running: Gaiters for trail running are usually very lightweight and compact. Their main purpose is to keep debris out of your shoes while you’re on the trail.

Gaiter Height

gaiter height assortment
Gaiter height depends on how much protection you need. Generally, for use in snow or when you’re heading off trail, you’ll want a taller gaiter. Shorter gaiters are great for trail running and hiking.
  • Over-the-ankle: These low gaiters are primarily designed for trail running or summertime hiking where the goal is to keep pebbles and other trail debris out of your shoes and boots.
  • Mid-calf: These gaiters are usually about 8-to-12-inches tall. These are best for less-than-extreme conditions when you just need to keep trail debris and rain out of your boots.
  • Knee: These are typically around 15-to-18-inches tall and are designed for rugged conditions such as hiking through deep snow and wet brush, or in bad weather.
 

Gaiter Features

anatomy of gaiters
Waterproof: Gaiters for mountaineering and snowsports are typically made with a waterproof, breathable material to keep moisture from snow and glaciers out of your boots. If you’ll be tromping through wet or snowy conditions, look for waterproof gaiters.
Insect repellent: Occasionally, you’ll find a gaiter that is made with insect repellent material to help keep mosquitoes, ticks and other biting insects away. This can be helpful for hiking and backpacking in areas known to be buggy.
Abrasion-resistant fabric: Some gaiters include rugged abrasion-resistant nylon on the lower portion. It’s designed to withstand the abrasion of ice, rocks and the occasional nick of crampon points.
Soft-shell fabric: Soft-shell fabric offers flexibility and stretch as well as excellent weather protection.
Coated nylon: Basic gaiters are very light and are usually made with polyurethane-coated nylon. If a short day hike or fast-packing through talus, sand or wet brush is on your agenda, this type of fabric will work just fine.
Entry system: Gaiters for hiking and mountaineering are usually opened and secured by long strips of hook-and-loop fastener (VELCRO® brand or similar) down the fronts of the gaiters.
Top closures: Basic gaiters are typically cinched with toggles and elasticized drawcords; some models are a bit fancier and feature a dedicated top strap with cam buckle.
Instep straps: These secure the lower edge of your gaiters around your boots' insteps. Basic gaiters come with simple lace straps. Premium gaiters feature beefier leather/synthetic straps for extra durability.
Lace hooks: Offered on some styles, these let you attach your boot laces to your gaiters for added security.
 

Tips for Choosing and Using Gaiters

a hiker adjusting their gaiters to fit properly
Size them right: Most gaiter styles come in sizes, which are aligned with a range of boot sizes. When you try them on, start by sticking the hook-and-loop front entry system together. Then engage the lace hook and adjust the instep strap to make sure the fit is snug. Your goal is to achieve the best possible seal around your boots.
Adjust the fit: You can use the hook-and-loop entry system to adjust the fit of the gaiters. For instance, if you have larger calves, you don’t need to overlap the hook-and-loop fastener all the way. Generally, a half-inch of overlap is sufficient.
Place the buckles to the outside: Put the gaiters on so that the buckles on the instep straps are to the outsides of your feet. If you place them on the inside, you may accidentally kick the buckles while walking.
Snug the top closures: You don’t need to overtighten the straps at the top of the gaiters. Just snug them up so the gaiters won’t slip down your leg. Overtightening them will be uncomfortable.
Use the hooks: On gaiters that have lace hooks, strive to hook the laces as far down on your boot as you can reasonably reach. On bigger boots, like those for mountaineering, you probably won’t be able to reach all the way to the laces closest to the toes.
Wear gaiters under your rain pants: In a downpour, try wearing your gaiters underneath your rain pants to create a shingled effect that effectively sheds rain. If you wear your gaiters over your pants, rain can run down your pants, underneath the gaiters and into your boots.

Wednesday, 4 April 2018

SIDETRACKED GUIDES: WILD CAMPING (PART ONE)


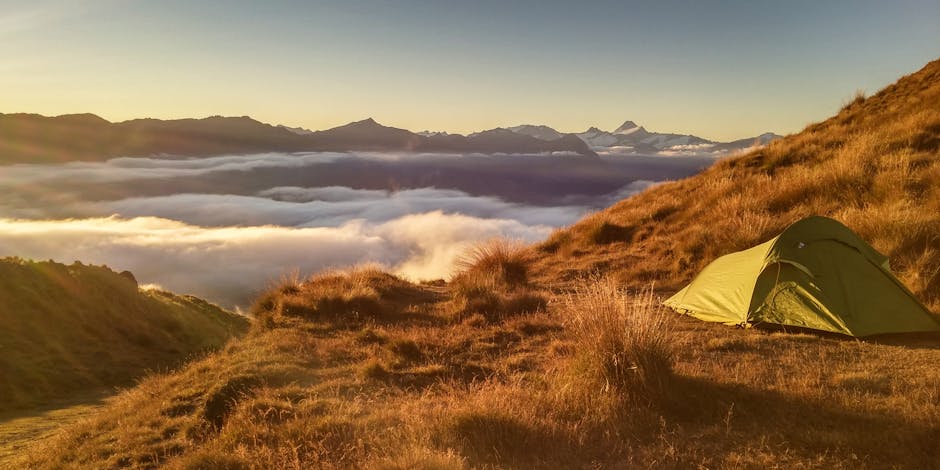
Green Tent On Top Of Mountain
Camping wild is not just about camping high on a hill – it’s about finding a place to lay your head for the night which is as much part of the experience you will cherish in two decades when you open up your moleskine as actually getting some sleep. It should bestow on you, if you are willing to sacrifice a little comfort, and to plan a little in advance, an experience almost unparalleled in the world of outdoor pursuits and adventure travel. There are few feelings as liberating, thrilling and rewarding as being immersed in your surroundings in the way camping wild allows you to do, whether those surroundings are a Scottish mountainside, the gardens of an ancient French Chateau or the simple arable land belonging to an Uzbek farmer. In this 3 part guide, Andrew Mazibrada looks at all the essential elements of camping wild, whether on two feet, two wheels or in a packraft.
My first night camping wild was a disaster. I was delayed out of London and paid a taxi driver more money than I care to admit to take me to the start of the trail because of the late hour. The night sky had the unearthly sable colour you might associate with Hades’ underworld and the rain descended in violent, relentless slashes. I walked by the light of a headtorch for an hour before finding a suitable place to camp. And by suitable I mean the only place within a mile that was not boggy or covered by a sheen of thick, muddy rainwater. My dual skin tent pitched inner first and, no matter how quickly I erected the inner, it was soaked before I could get the fly on. I crawled in, the rain dripping off every part of my body. Fortunately, by luck rather design, I had a synthetic fill sleeping bag so, damp as it was, it was still warm enough. I dumped my wet clothes in the porch of my tent and pulled on some warm, dry clothes before slipping into my bag. I was so exhausted that even the thunderous percussion of the rain on the fly was not enough to keep me awake.
The next morning, I awoke to light inside the tent so bright it almost blinded me. I rubbed my eyes and yanked on the zip. The sight which greeted me I recall as being so majestic, so beautiful, so utterly inspiring that to this day, I wonder whether I will ever better it. Memories are sugar-coated like that. The sun was just rising, casting a crimson veil across the mountains, the forest and the lake in the valley below. The sky was the colour of autumn leaves. I sat in my bag and allowed this sublime vista to erase from my memory the hardship of the night before, cradling hot tea in my hands and watching porridge bubble away on the tiny stove in front of me. I suspect that the panorama was as much a function of the situation as how it actually looked, but in the moment, I was hooked.

WHERE TO CRASH

Let’s be honest: a breathtaking view is the pinnacle of wild camping but the main requirement of a ‘pitch’ is a good night’s sleep. You can’t spend hours looking for the best spot every time but turn your mind to it early enough and you’ll find something memorable. To some, the camp is what it’s all about, to others it is simply a means to an end. Where you choose to camp, for how long and how long you spend looking for the perfect spot will depend on what you want from your overnighter. Either way, for all practical purposes, you will want flat, horizontal ground without major lumps, rocks or holes. You can probably live with a slight slope if that’s all there is, but pitch on the slope so you’re laying head-to-toe downwards. I suggest you lie on the ground first before pitching your shelter – it’s a challenge to find enough level ground in some areas and you should allow at least an hour or so for this whilst you have daylight. Idyllic as they are, level pitches near a water source are often boggy and make sure you take into account the space needed for guylines. Clear the area of twigs and stones to protect your shelter’s groundsheet. If there are two of you, face the porches towards each other – it makes cooking and being sociable that much easier.
You may not even need a shelter – one of the best night’s sleeps I’ve ever had was in my sleeping bag, on a mat laid on a gravelly beach, with only the stars above me. A clear night, without a hint of rain and reasonably warm. The freshwater of a Swedish lake only metres away from me, it was a joy not to be inside a tent. In Scandinavia, you’ll find laavu (Finland), gapskjul or slogbod (Sweden), and gapahuk (Norway). These are open lean-to shelters which provide a roof and, often, a place to light a fire. These are great places to sleep.
Aim for a sheltered pitch if possible, especially if you anticipate strong wind overnight or even a medium wind in cold weather. Pitching on a summit may reduce condensation by encouraging airflow through the tent but good shelter is harder to find. You should pitch the ‘sharpest’ point of your tent towards the wind. This helps the wind bleed off the shelter’s fly, maintains stability and reduces noise.
Eat something before you go to sleep and/or go for a walk. If you’re in the hills, bag a night-time summit but remember your camera if the sun is dipping below the horizon – this is often the best light for landscape exposures. In a township, the late evening is the best time to go explore. If you’re staying on private land with the permission of the locals, think about getting to know them (and bringing a gift always helps). This extra exertion burns calories, as does the energy required to digest the food you’ve eaten – both produce heat. Get into your bag hot and you’ll stay warm. Don’t expect your bag to warm you up if you’re cold already.
Try to be creative with your pitch. As Tom Allen says in his superb guide “How to Wild Camp Anywhere and Not Get Busted
adventure, autumn, camp
“Actually, you’ll be surprised where you can get away with putting a tent, sleeping rough or blagging a horizontal surface! Sometimes, in ‘emergencies’, it’s been fun seeing what’s possible in this regard. I’ve slept in bus shelters, inner-city parks, building sites, roadside verges, subways, empty garages, petrol stations, fishing boats, tramps’ hovels, hotel gardens, under tables, drainage pipes, storage sheds, abandoned buildings — even about five metres from a busy main road in full view of anyone who cared to stop and take a look!”
Tom Allen’s website, Tom’s Bike Trip, is a superb way to inspire yourself to see the world differently while you camp anywhere.

RESPECT YOUR SURROUNDINGS

You can sleep almost anywhere; the only issues in reality are safety and legality. The former probably prevents you from camping in certain areas of inner cities and the former is as much about respect and engaging with people as it is the lexicon of the law.
For example, camping anywhere without permission is illegal in England and Wales. Almost all the land in England and Wales is owned by someone and you should, in theory, try to seek the permission of the landowner before entering private land (The only exception in England and Wales is Dartmoor where an old statute makes it legal). Wild camping in Scotland is legal. Much of Europe has similar rules to Scotland. When you get out into wilder places the gap between pockets of civilisation increases and few will mind where you camp if you respect your environment. Camping in the wild is tolerated by most if you:
  • Plan ahead
  • Don’t camp on ground which is likely to be affected once you leave
  • Respect wildlife and the your surroundings
  • Take out yours, and other people’s, litter
  • Keep groups small and be considerate of others
  • Camp unobtrusively and quietly and, remember, noise travels further in the hills
  • Camp in quiet, rarely used spots
  • Don’t stay in one place for more than a few nights
  • Don’t light fires if you can avoid it
  • Don’t camp right next to a water source and ensure any camp toilet is at least 30m away from a water source
  • Bury toilet waste in a small hole and carry out toilet paper as animals will dig it up
Think about waiting until after dark before you camp and be quiet and courteous. Try engaging with local people. Ask around – after all, this is one of the reasons to travel and experience the world from a different angle. Getting to know people leads to all sorts of opportunities and, in general, learning a little of a foreign language and making an effort wins the respect of the people you’re speaking to. You will want to be inconspicuous – both with shelter colour choice and with location – locals will respect you for it and those wishing you ill (which is so rare) are less likely to come across you. Wild camping is one of the best ways to experience the outdoors but it requires respect for others, respect for the land around you and respect for your own abilities. Follow those simple rules and it will be an unforgettable night’s sleep.
Don’t be afraid. Nothing will happen to you. Despite Hollywood’s best efforts, the world outside of civilisation is not populated exclusively by psychopaths with axes. Nor do wild animals find you interesting or a source of food – they are more afraid of you than you are of them (and, given our history, with good reason). Just enjoy. We’ve all camped in some incredible places – some take effort, some take nerve but all require a modicum of respect and courtesy. Plan ahead, engage with others and you’ll be fine.
Whilst trekking in Croatia some years ago, I approached a elderly local man sitting on a rickety chair outside his home. It was late evening and I’d been walking in the unvarnished heat for some time. Despite my father coming originally from Croatia, I had never had the chance to learn more than a smattering of Serbo-Croat but I fumbled my way through asking if I could camp in one corner of his land. He understood what I was saying after a few false starts and shook his head vehemently. He led me to a fig orchard behind his house and bid me to pitch there. Better shade in the morning, he explained slowly, and then ushered me to his home. I went with him and shared with him and his wife an evening of prÅ¡ut (local dry-cured ham), figs and warm bread, with a little too much local Å¡ljivovica. I had a heavy head the next morning, but the connection I had made to genuine local people was worth every painful throb.
Kit is a personal choice but giving thought to what you really need and how you’re going to carry it will make your trip much more comfortable, enjoyable and, above all, safe.
As David Lintern knows, it’s possible to walk from hut to hut across the Pyrenees but the Haute Route Pyrenees is different. It is an unsupported, non-waymarked trek via high peaks and passes with resupply only possible every 5-10 days. It’s around 450 miles in length and takes 45 days long or longer with detours. HRP thru-hiker David has a few hints for camping on long distance trips:
  • Pace yourself — think tortoise and hare. Most route mistakes are made when hungry, thirsty or tired.  A good, comfortable pitch with wonderful views is worth stopping early for, you can usually make up the time in the morning.
  • Sore legs?  In real life pitch sites are rarely flat.  If on an incline then sleep head down, (a runners trick, this drains lactic acid which builds up from heavy muscle exercise).
  • Water supply – on a long trip you will usually be carrying dehydrated food.  This makes water supply way more important than mere comfort, as you can’t eat or drink without it.  Plan ahead for last water point before stopping, and be aware of the geology around you: certain rocks are porous.
  • Know your sunrise and sunset times and give yourself some leeway.  It’s ok to walk in the dark if the route finding is simple but not fun being caught out if you are not expecting it.
  • Cold air sinks. Be careful of sheltered nooks, they may be chillier than expected in the small hours.”

Tuesday, 3 April 2018

3 Reasons a Tree Tent Will Make This the Best Camping Season Yet

If you’re an avid outdoors person, you’re likely excited camping season is here. What could possibly be better than falling asleep to the sound of crickets and waking to a fresh morning breeze? Well... how about doing it in a tent hanging above the ground? Here are three reasons a treehouse tent will make this your best camping season ever.

1. Sleep better on a truly flat surface.

Stop hunting around the backcountry for a flat spot to put your tent. All you need is three trees and you can string your Tentsile above boulders, streams, or any swath of lumpy ground.
BONUS: We teamed up with the Sleep Outside experts at Klymit to produce the Skypad, a comfortable sleeping pad perfectly designed for use with our tents.

2. Experience your old love in a new way.

Chances are you’ve been camping for a long time if not your whole life. You might have fond childhood memories of family camping trips. And since the beginning, you've either been on the ground or camping in a hammock. Camping in a tree tent transforms your longtime love into an entirely new yet familiar experience!

3. Have more fun!

Let’s face it, sleeping in the trees like a jungle animal is just plain fun. Take the kids or be a kid yourself to engage your playful, creative side. Look down on the forest floor from a whole new angle and revel in the novelty of doing something just for the fun of it. 

Monday, 2 April 2018

DOUBLE HAMMOCK CAMPING: FUN AND ADVENTURE WITH YOUR CAMPING PARTNER

Double hammock camping has a lot to offer a pair of outdoor adventurers. Keep reading for all the information you need to get started on this exciting outdoor trend.

WHAT IS A DOUBLE HAMMOCK?

One challenge that many have with hammock camping is that they make the assumption that hammocks are strictly for one person. The truth is that double hammocks are actually very common and don’t add a lot of weight or bulk to a light pack. In fact, a double hammock can save an enormous quantity of weight if you are hiking with another person.
Just think about all the things that a hammock replaces and it is easy to see why so many people are ditching their tents for hammocks.

NO NEED FOR TWO AIR MATTRESSES

Many of us love our camping mattress but let’s be honest, even the lightweight mattresses are extra weight, especially when you add in that you need two. Many people that camp with a partner also bring along special straps to keep the mattresses from moving apart. With a hammock you save several pounds.

HIT THE TRAIL WITH DAYPACKS

If you don’t have to carry a lot of equipment, then you can have a night or two out without using heavier expedition packs. This can make for a much more comfortable experience and you will be more likely to get out more if you can pack up and hit the trail quickly and easily.

TENTS CAN WEIGHT 5-10 LBS COMPARED TO A 1-2 LB HAMMOCK

Tent and hammock weights will vary based on the style, amenities, materials, and brand but you can expect your hammock is going to weigh up to 80% less than a standard two-person tent.Little River Co.’s hammock (including straps) weighs about 2 lbs.  Tent metal poles can really add a lot to your pack and you have to use straps to secure it to a larger pack than you need if just taking a hammock.

DOUBLE HAMMOCKS KEEP YOU WARM


Anyone that has camped much knows how cold the ground can be. If there is moisture present, it can feel even colder. A double hammock allows you to be suspended above the ground so you are not exposed to this.
Also the hammock creates a nest-like environment that uses the body heat of two people to make even camping in colder conditions, comfortable and doable.
A blanket or lining for a double hammock doesn’t weigh twice as much as that required for two solo hammocks so you save even more weight rather than having a tent.
The snug and closer quarters make it far easier to stay warm. Double hammocks are exceptional for fall and winter camping.

STRAPS MAKE IT EASY TO CAMP ALMOST ANYWHERE

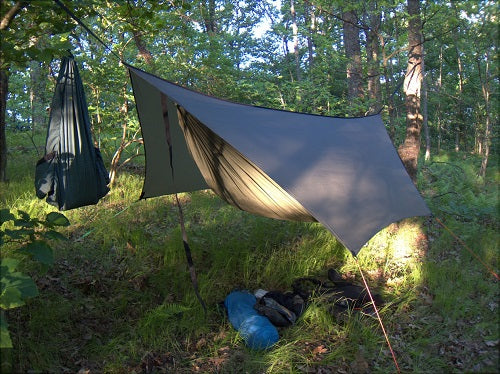
Adjustable straps mean that you can set up a double hammock anywhere there are two things to attach to. Getting the perfect swag or hand to your hammock is not hard when you have an easy way to adjust it. Trees are the most common thing to anchor to but there is no reason why you cannot use other things if they are able to support the weight.

SIMPLE SET UPS FOR AREAS WITHOUT TREES

Large rocks and more can be used to suspend a hammock however it is also fairly simple to make or purchase a suspension system that you can take along to hammock camp almost anywhere.
So even if you are a hardcore hiker that likes to get into some rough places and above tree line, then you should consider the benefits of hammock camping. Suspension systems do add some additional weight, but it is still far less than the weight of a tent.

DOUBLE SLEEPING BAGS FOR HAMMOCKS

If you are sleeping double than sleeping bags that zip together or just one large one built for two can be nice to have. The ones that zip together offer more versatility if you occasionally camp solo. Since many hammock campers are trying to achieve lightweight packs, it pays off to purchase the most lightweight one you can for the warmth level that is needed.
Hardcore campers often have several different bags so they can be comfortable during any season of camping. Although high grade, lightweight materials cost more on average than heavier materials, if you plan on camping a lot, don’t settle for less just to save a few dollars. Sometimes it is the small things on the trail that make it a lot more pleasant to be out there.

UNDERQUILTS

One complaint that some voice about hammock camping is that the air space underneath the hammock can sometimes make it hard for your bottom portion to get and stay warm. This is of course only going to be an issue in the fall or winter months for most people. The solution to the problem is what is called an underquilt.
This is a quilted blanket that is made to go under you and provide more insulation. Some camping mattress or lightweight foam pads can work for this as well with some or no augmentation necessary. A mylar blanket or lightweight fleece may be all that some need for a higher level of comfort.

SLEEP IN SUPREME COMFORT

One of the first questions that many people ask when it comes to double hammocks is “are double hammocks comfortable?”  Hammocks do offer a high level of comfort if set up properly.
One of the biggest hurdles is learning how to get in and out of the hammock safely and even this doesn’t take much practice. Some people also need a few days to adjust to sleeping in a different position than they are used to sleeping in within the confines of their own home.

ENJOY LESS EXPENSE

Hammocks are a lot cheaper than many quality tents. Sure you can pick up a cheap tent and get a few nights out of it but there is little guarantee how comfortable you are going to be, especially if it rains or the wind blows much at all.
Sure you can pick up a cheap tent and get a few nights out of it but there is little guarantee how comfortable you are going to be, especially if it rains or the wind blows much at all.
A good lightweight backpacking tent for two can cost $300-$1,000+, far outside of the budget for many people. With hammocks, everyone can have great comfortable access to the great outdoors without a ton of expense.

A DOUBLE HAMMOCK DISCOURAGES EXTRA BAGGAGE

A tent gives you more space to store things and spread out so you are more likely to bring along items that you think you need but don’t really use that often. Hammock camping is all about keeping it light and being able to move in comfort.
People that enjoy longer trail hikes with their partner will be amazed at how light they can pack for even very extended endeavors into the wilderness.

SHARE BUT KEEP SOME THINGS SEPARATE ON LONG TRIPS

While double hammock camping means that one person doesn’t have to pack a shelter, it is important that each person carry some supplies in case they become separated.
A small medical kit can be packed in a container no larger than a small paperback book. There even exists very basic kits that fit into a tin the size of a pack of playing cards.
Each person should be sure to pack their own clothing. One of the worst things when out camping can be getting wet and then cold. Layers are best on any excursion. A high-quality rain coat can literally save your life on the trail.
High-calorie foods packed in waterproof packaging can make a big difference and should definitely be a part of each hiker’s pack. Water is crucial so even if one person has a high-grade backpacking water filter, the other should carry at least something that can turn water into safe and drinkable water. Water bottles with built-in filters or water purification tablets can be used for backup in case of an emergency.

TRY IT OUT BEFORE HITTING THE TRAIL

Like any new experience, it can take some time to fine tune your hammock sleeping style and learn to hang it properly. Find a space where you can hang your hammock and then practice getting in and out of it. Try adjusting the straps and then getting in. Closely observe how the hammock hangs when you find the level of support and comfort you want. This will make it a lot easier for you to pitch your hammock at the end of a day on the trail, and get a good hang the first time.

SLEEPING POSITIONS

It might be advisable to try out sleeping in your hammock in a backyard or close to home so you can test out sleeping positions. If you are sleeping in the hammock with another, the way you sleep that is most comfortable may very well vary from how you would sleep if alone in the hammock.  If it seems that pressure is being put on a specific area of your body, then changing positions or adjusting how the hammock is hung will help alleviate these problems.
Many people recommend trying to sleep more sideways in the hammock rather than the standard up and down position. This helps spread out the support of the hammock so your chances of sore spots are greatly reduced.
Don’t worry if at first it seems like you are having a hard time getting comfortable. You will be amazed how quickly you learn what works best for you and your partner. A night of learning means a higher level of comfort when you finally hit the trail and get started on one of the life’s great adventures.

THE PERFECT CAMPING TRIP WITH THAT SPECIAL SOMEONE

Hammock camping offers a certain level of closeness and romance that tents don’t. A night or two out under the stars can be the perfect romantic weekend for the adventuresome and outdoor loving couple.
A double hammock can be a great gift as well. Many new hammock users are surprised when they get their hammock and realize how small a bag it can fit into. Planning out trips together can be a fun part of any relationship.

WEIGHT LIMITS

We all come in different shapes and sizes. Hammocks are like people in this respect. Always make sure that you are not exceeding the weight limit of your hammock. Many campers forget to include the weight of the gear and sleeping accoutrements that are in the hammock.
Larger people may find that a double hammock is a better choice for them than a single or solo hammock made for average-sized or smaller people. This also ensures that you have plenty of weight capacity and room for supplies and bedding.
It also pays to keep in mind that hammocks are often stronger than their weight limit implies but they may wear out sooner if the limit is exceeded very often. It is better to err on the side of safety.

DOUBLE HAMMOCK CAMPING PLANNING

Since double hammock camping implies that you will be camping with another, then you need to make sure that you are intending on going on a trip you will both enjoy. Sometimes couples or friends that are camping together have very different levels of experience when it comes to the great outdoors. 
Exceeding the abilities of someone on an initial trip is a good way to make sure that they don’t have the desire to go on another trip. You don’t have to plan a 40-mile trek in order to have a memorable and fantastic time out on the trail.

CAMPING IN A GROUP

Exploring the wonderful world around you can be a lot of fun in a group. Getting together a few friends is not hard and you can feel good about encouraging others to get out in the wilderness and let loose. A trip to the woods can be very refreshing and help increase the productivity of everyone.
Many of those near wilderness areas likely have groups in the area that are dedicated to organizing outings or social events to connect with likeminded individuals.

REALIZING WHAT YOU REALLY NEED

The type of trip you go on determines what you really need the most. The essential supplies for a hammock hiking and camping trip are listed below:

NUTRIENT AND CALORIE RICH FOODS

Dietary concerns are different when you are on the trail because you are most likely burning more calories than you otherwise would. It is important to eat enough to sustain the energy level required for the type of trip you are on.  Colder temperatures often result in higher calorie requirements so you can stay warm.

LAYERS

The concept of wearing layers cannot be stressed enough no matter what type of camping or hiking you are doing. Layers allow you to adapt easily to changing climatic conditions. Layers can actually be a lifesaver because they will ensure that you stay dry and warm.
Hypothermia is a condition that can occur in more types of weather than often gets acknowledged.
If you are hiking the Appalachian Trail and it is 65 degrees outside you can still get hypothermia if it is raining and you get cold and wet for an extended period of time.

WATER PURIFICATION METHODS

If you are just on a day trip you might be able to pack enough water to get through your trip. If you are away longer than that then a water filter or purification tablets will be necessary if you are away from traditional water sources. Some people prefer water bottles with built in filters rather than a pump system if they are just going away for a night or two.
Longer treks necessitate the use of real ceramic camping water filter.  The more contaminated or dirty water is, the better the filter required. Filtering water from dirtier sources can mean changing your cleaning your filter more often than normal.

MEANINGFUL ITEMS

Your trip should be a deeply personal experience. While it is important to not go crazy packing unnecessary items, don’t discount things that mean something to you and add to your experience. If you want to write, then make sure to bring a journal and writing implements.
If you want to burn some incense and meditate in nature, then pack what you need. One of the beautiful aspects of hammock camping is that you save on weight so you don’t have to feel as badly or be overly concerned about packing some extra items that make for a richer experience for you.

RAIN AND BUG PROTECTION

Even if you don’t see any rain on the forecast it is better to be safe than find yourself and your companion wet and cold. Double check your gear for a tarp or similar covering you can hang up for protection from rain.
Those that are in buggy environments will not regret packing mosquito netting and some bug spray. If you don’t want to use bug spray directly on your skin, you can spray it on your shelter and get really good results.

MEDICAL KIT

Your medical kit should be adjusted to the length of your excursion and how far away from services you will be.  A very simple kit is all that is needed for day trips while those that are embarking for a week or two may want some major medical supplies in their pack.
An outdoor supply store can help recommend what you need for your style of camping or you can build your own basic kit that you can add on to for more lengthy excursions.

COOK STOVE

If you are in areas that don’t allow campfires, then a camp stove should be on your list of items to pack. A good quality propane stove can be a real nice thing to have even if an area allows fires because there is less risk of starting a forest fire and you can cook foods much more quickly.
Taking the time to build a campfire is sometimes just something you don’t want to have to deal with for a hot meal during or at the end of a long day.

GOOD FOOTWEAR

Even a day trip should not be done without good footwear. The way you feel at the end of the day has a lot to do with what is on your feet. Shoes that fit well and provide a good level of support will make it more likely that you want to go on another trip.
Buying footwear online is fine if you have experience with the brand you are purchasing. If you are unfamiliar with a brand, then you may want to try on a shoe before buying. If the fit is not quite right, then a pair of high-quality insoles can make a huge difference in your hiking experience.

THE JOY OF CAR CAMPING WITH A HAMMOCK

Sometimes you may not want to walk a long way to camp. Just getting out can be enough at times! A hammock can be pitched almost anywhere, especially if you have a suspension system that can be attached to the ground.  Car camping allows you the luxury of being able to pack a lot of gear without having to worry about carrying it or unpacking.
Car camping with a hammock allows you the freedom to have a great time almost anywhere. With a double hammock, you and your partner can hit the road and have an adventure but still be back for work and school come Monday morning. A hammock is a small expense that can open up a whole new world to both of you.

FINDING GREAT SPOTS FOR CAMPING

Some areas are more blessed with great spots than others. Luckily a hammock allows for setting up camp in areas that are not friendly to tents. You don’t have to worry about clearing out a spot to camp. All you need are two anchor points and you are set!
National Forests have many different camping areas to choose from. If you are a major traveler, then a hammock can be a great thing to have in your bag if you are exploring other countries or space is limited at a hostel or other boarding establishment.
Your local ranger station or parks and rec department website can offer a lot of good advice for where to camp. Remember to always check the rules for camping wherever you go. Some parks may allow you to pitch a hammock wherever but not build campfires.

Sunday, 1 April 2018

Finding or Building a Fire Ring

campfire ring at a designated campground
Campgrounds: Build fires only in designated fire rings, grills or fireplaces. Most developed campgrounds have some version of these. Using a fire ring will lesson your impact and keep your fire contained.
Always check with the campground operator to make sure fires are permitted. In some areas, severe dry periods can cause campfires to be prohibited even in campgrounds.
If you’re car camping in an undeveloped site, check in advance with the agency that administers the land (U.S. Forest Service, Bureau of Land Management, etc.). A campfire permit may be required.
Evaluate the site before starting a fire. If the site is brushy or has low-hanging branches, keep your fire small or skip it altogether. In dry conditions, fly-away embers could easily ignite a wildfire.
Backcountry: In backcountry areas where fires are permitted, use an existing fire ring if one has been left behind. Build a new one only in emergency situations and, if the situation permits, dismantle it when you are done. If one already exists, clean it out before you depart.
Clear away all flammable material from your fire pit. Ideally, the base of your fire should be sand or gravel or mineral soil (often found in streambeds or on gravel bars). Intense heat can sterlize healthy soil, so choose your site conscientiously.
An alternative to a fire ring is a mound fire. Using your sanitation trowel, build a circular, flat platform of mineral soil (sandy, light-colored, nonfertile dirt) about 6-8 inches high. Use this as the base for your fire. Ideally, build this platform on a flat rock. You can easily disperse the mound when you're finished.

Gathering Fire Wood

the various types of campfire fuel: tinder, kindling, and firewood
To burn a successful fire, you’ll need three types fuel: tinder, kindling and firewood.
  • Tinder includes small twigs, dry leaves, needles or forest duff.
  • Kindling consists of small sticks, typically less than one inch around.
  • Firewood is any larger piece of wood and is what will keep your fire going long into the night.
Campgrounds: Use only local firewood. Nearby stores often carry firewood, and sometimes campground hosts offer bundles of firewood or kindling for sale.
Do not bring wood with you if you’re traveling from more than 50 miles away. Campgrounds may even ban bring-your-own firewood regardless of the distance you travel. Why? To avoid introducing troublesome insects into a forest.
Call the campground or a local ranger office in advance for information and advice.
Backcountry: If you forage for firewood, gather only downed wood far from your site. Never cut live trees or break off branches from standing trees, even dead trees. Birds and wildlife make use of dead branches and snags.
Do not gather or burn pieces thicker than an adult's wrist. This is because thick chunks of wood are rarely allowed to burn completely and are typically left behind as blackened, unsightly scraps.
Remember to follow Leave No Trace principles when gathering wood. 

Building a Campfire

three different types of campfires to try: teepee, log cabin, and pyramid
Kindling and firewood can be assembled in a number of different ways. Popular styles include the teepee, log cabin and upside-down (or pyramid).
Teepee: Start with a small cone of kindling around a few handfuls of tinder that are loosely piled in the center of the fire ring. Once the fire is going strong and the temperature increases, you can add larger logs a few at a time as needed.
Log cabin: Place two larger pieces of firewood parrallel to each other and with some room in between to form the base of your structure. Then, turn 90 degrees and place two slightly smaller pieces on top and perpendicular to form a square. Place plenty of tinder inside the square. Continue adding a few more layers of firewood around the perimeter, getting a little bit smaller with each layer. Finish with a layer of kindling and tinder across the top. Remember to leave space between logs so the fire can get plenty of oxygen.
Upside down (pyramid): Start with three or four of your largest logs side-by-side on the bottom layer. Turn 90 degrees and then add a second layer of slightly smaller logs on top. Continue alternating a few more layers in this manner, getting smaller as you go. Place your kindling and tinder on top.

Lighting a Campfire

a camper lighting a campfire
Light the tinder with a match or lighter. Using fire starter that is designed to easily ignite can help the tinder catch the flame. (Be sure to carry waterproof matches and firestarter. Fire-making materials are considered one of the Ten Essentials.)
After lighting the tinder, blow lightly at the base of the fire to provide oxygen, which will help increase the intensity of the flame and further ignite the wood.
As the fire burns, move embers to the center to burn them completely. Ideally, you should reduce them to white ash.
Shop REI’s selection of fire-starting gear.

Extinguishing Your Campfire

using water to extinguish a campfire
Extinguish all fires by pouring water on them, stirring the ashes, then applying more water. Repeat as often as needed. Ashes should be cool to the touch before you leave the site. Be utterly certain a fire and its embers are out and cold before you depart.
Never leave a campfire unattended!

Cleaning up Your Campfire

Burn trash items only if they can be fully consumed by fire and turned to ash. Do not attempt to burn plastic, cans or foil. If you do burn something that's not fully consumed, collect the remains when the fire is out and either pack it out or put it in a trash receptacle.
When you’re in the backcountry, pack out any trash found in your pit. Extract any charcoal pieces left inside your ring, carry them away from your site, crush the chunks, then scatter the remnants and dust throughout a broad area. Dismantle any structure you might have built.

Wild Camping Tips and Kit List

The first rule of Wild Camping club is...  actually really simple! Leave No Trace: if you take it in, you carry it out. What is wild camp...